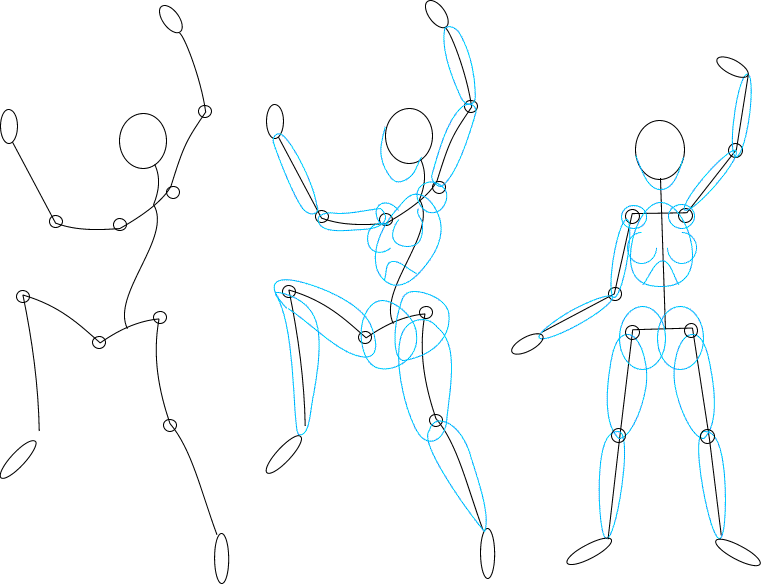

Here is the first instalment of basic figure construction. This is not to say figure drawing based on observation, we'll tackle that later, but figure construction, allowing you to invent figures, and draw them in a variety of positions by discovering the structires that the body is made of. Keep in mind, please, that these are the most basic of instruction, and are no substitute for books like How to Draw the Marvel Way by Stan Lee, or Burne Hogarth's masterful Dynamic Figure Drawing. However, these will prepare you for what to expect from those books, and should be taken in sequence from here, to Stan Lee's instruction, to Burne Hogarth for the more advanced artisan.
On that note, We'll keep this short and simple as possible.
Below are three drawings. which start with a stick figure. Now this may seem to be a joke, but the stick figure helps give us proper proportion and a frame upon which to work. Therefore, the stick figure needs to be examined in depth simply because if we are working on this frame it must have proper proportion or the finished drawing will not look proper.

Okay... now that we have an idea of how our stick figure should be proportioned, let's work on filling out our figure.
What you are trying to accomplish here is what amounts to a three dimentional rendering on two dimentional paper. Keep this in mind as you draw.
The rib cage is normally in the shape of an egg. with two globes atted to the top for the shoulders. Notice the first two drawings showing the progression from Stick Figure to the bulbble fills. In that first stick figure the curvature of the spine is noted, this is important, and upon that is where you should place what would be the back of your egg shape for the rib cage, and build on it from there. Remember that even though your stick figure should have proper proportion, you can correct anything that looks odd by erasing and replacing the bubbles.
Notice too the line that reprecents the ribcage in front on the bottom, add this as necessary to keep perspective. Since we are drawing a female, the breasts should be just above this and well below the bubble representing the shoulders.
For the pelvis I prefer to use two bubbles that represent the buttocks. I do this regardless of wheather or not I'm looking at the figure from the front or from behind.
The limbs can be difficult to created at first. They are basically elongated ovals that are wider at the end that is closer to the body.
What you can do is print out the image above, and practice drawing around it. Get used to holding your pencil lightly and drawing ovals easily without significant force...
AND:Practice Practice Practice. Look at drawings in Comics, and practice emulating those drawings. Look at magazines, and practice emulating figures represented in them.
In the rush to get this page up, as has been requested by many, I have probably left a lot out that needs to be addressed. Your comments are welcom so E-MAIL me if you have any and i will be sure to take them into consideration when updating this page, as I will most assuredly do.