"
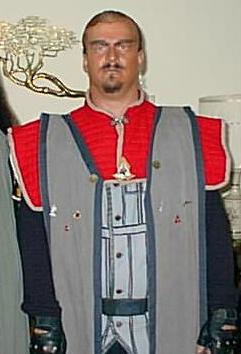
This piece was very labour intensive, it was all hand stiched and thus created some problems for me. It is canvas vinyl on denim with placticized vinyl trim work. It was about 100 hours of work, but I think the next time I do one like this I'll see if I can do it on the sewing machine. This piece involved hours of pleating the canvas vinyl so that it would give the layered look you see here, the bulk of the work came from hand stiching these panels onto the denim vest. Mind you this denim vest was originally just a jean jacket so there was the problem of trying to stich through the seams that were there. I think I lost about a pint of blood from that darn needle, but hey it makes the piece look like battle worn armour. On the back there is the spinal armour, which was made from the covers of cheap poly-binders. These make an excellent material for this. The shoulder armour and the cloak were not of my design. I appologise for the less than clear picture of this piece, but it is the only one I could get.


This was the first Klingon vest I had done and it was done in a rush as the person I was doing it for was going to be leaving in three days. Now since this was a first try and I had extremely limited time constraints, What I did was hot glue strips of vinyl onto an existing vest. I think I burnt myself on this one at least 20 times, I decided after this one that hot glue guns were not the way to go and decided stiching would be better. The use of glue, though faster than sewing leaves another problem, on days where it is hot an sunny out, it starts to melt and pieces come off, this isn't a good thing. My advice here is that anyone who plans on going out and using the glue to put one together in a rush, go ahead and use glue, but as soon as you get time, stich the pieces on, otherwise it won't last. Like Red's Battle Vest, this too has spinal armour made from the Poly-binders, but it also has detachable shoulder armour, which is just vinyl coverd poly-binders. Those poly-binders are wonderful arn't they. What makes the shoulder armour detachable is that I sewed buttons on the bottom of the armour before putting on the vinyl and cutting button holes into the corresponding sites on the vest piece. This allows for the shoulder armour to be taken off if it is too cumbersome or must be cleaned/repaired.