You will Need:
1 Crossbow Grizzly (part 1225)*
1 Pin 1mm across
30mm Balsa Strip 1mm x 1.5mm
1 Hex Base
2 Frag Cannons (from Assault Weapons 1403)
1 VHAC (from Support Cobra**
1311)
5/16" length of round Molding Sprue hollowed out to fit around
pin
1 Steel Rod 1/16" x 16" (or a HRP/24 from King Cobra 1313)
Lead*** (only a small
quantity is needed)
Dikes (for cutting steel rod)
Dremel Rotary Tool
X-Acto knives
Removal of LMG from Chassis
Addition of FGCs to Chassis
Replacing of HAC with VHAC
Creation of 'Mohawk'
Creation of VibroAxe
Creation of HRP/24

Adding the Frag Cannons
Begin by removing the LMG from the right lower torso
of the Grizzly chassis. The 2 hardpoints molded on the chassis
may also be removed. Next cut the FGCs off at the chamber, and remove
the magazine tubes. File down the bottom of the pump to about half
it's original height, slightly rounding the corners. Apply superglue
to the Grizzly chassis where the LMG was and in the same postion on the
other side of the chassis. Place the FGCs with the front sight hooked
over the armor plating with the remainder of the pump pointing out.
Attaching the Very Heavy Auto Cannon
Begin by removing HAC from the Grizzly's right arm
with an X-Acto knife,if done carefully, this gun can be saved. There
are two small knobs on the outside of the Grizzly's arm which must be removed,
as this is where the VHAC attaches. Paint the arm in the camoflage
you will be using, except for the botton and a strip along each arm where
the support arms are glued on, as it is very difficult to so after the
gun is attached.
Attach the VHAC* from the Support Cobra. This
gun unfortunately cannot be removed w/o destroying the arm of the Cobra,
or losing the support mounts on the gun. I was fortunate enough to
have a friend who's Cobra became FUBAR and was allowed to destroy the arm
for the weapon. Any parts such as the hand gaurd or similar pieces
destroyed or lost in the process of removing the gun can be replaced rather
easily using some thin strips of balsa bent to shape.
Making the 'Mohawk'
Take a piece of scrap pewter or lead that is 8mm(l)
x 3mm(h) x 2mm(w) and cut out about a 4mm(l) x .5mm(h) chunk from
the bottom. then, starting on the other end, file away from the corner
to the notch at an angle so you end up with a .25mm lip, and a slight
angle coming form the other end (this allows for the mohawk to slope gently
along the top). Place on the head of the grizzly, with the lip pressed
against the rise in the grizzly's head, thin edge pointing forward, to
check for proper height. File as needed to make the back fit.
Place again on the head and bend the thin portion down until it touches
the sloped portion of the Grizzly head. File this portion of the
mohawk so that it is noticable thinner at the front of the bent portion
than at the back, but DO NOT bring it to a point. the section behind the
bend should remain squared. when this is done, slightly round all
corners and glue to the head.
Building the VibroAxe
Next hollow out the left hand, this can be accomplished
with a Dremel and small round engraving bit #106 or a small drill bit.
Cut a 1 1/4" length of the Pin. Take the hollowed sprue and carefully
cut into 1/8" and 3/16" lengths, being sure not to crush it. Slide
the 1/8" piece down the pin until the top of it rests 9/16" from the tip,
and glue in place. Take the axe handle at this stage and insert it
into the hollowed left hand of the Grizzly. Taking the 3/16" length
of sprue, slide it over the bottom of the pin, and up until a little less
than 1mm of the pin is showing. CAREFULLY glue this in place on the
pin making sure NOT to get any glue on the hand. DO NOT GLUE HANDLE
IN PLACE AT THIS POINT!!!
Use the hexbase and a larger cutting tip for the
Dremel to cut the shape of the axeblade. (Mine measures 19/32" tip
to tip on front, 716" tip to tip on back, and 5/8" from center to center
on blades when finished and assembled.) Sand or file this down to
a bit over 1/16" of an inch thick. Near the blade, begin tapering
the metal to a point to reseble a sharpened blade. Place the blade
against the pin for reference and decide how you like it positioned best
(fore and aft, as well as angle). When you find how you like it, cut the
axe blade in half at that location. Using a hammer, pound some lead
EXTREMELY thin, I flattened it to about 1/3mm. This will be used
as either two plain straps to hold the two halves of the blade together,
or can be shaped as is shown in the Panda's Tech drawing in the Vehicle
Record Sheet book for additional realism (I prefer the plain strap as the
lead becomes very weak at this thickness).
Using superglue, attach the two havles of the blade
to the pin where you like it (the center of my axe attaches at 9/32" from
the tip of the pin, aligning the lower point of the front blade with the
top of the smaller section of sprue). Take the flattened lead and
cut into strips wide enough to go from the top to the bottom of the middle
of the axe, and long enough to cross the pin, and still attach to the the
axe(mine measure 2mm x 6mm). Then take the two leaden straps attaching
them with superglue so they cross the joint, covering the pin and firmly
contacting the axe (be sure to glue the straps to the pin in addition to
the halves of the axe). Slide the axe so that the hand aligns in
the middle of the two pieces of sprue, and rotate handle till axe faces
outward. Glue the axe in place.
Take the 30mm strip of balsa and cut into a 10mm
and a 20mm strip. Put a small V-notch in one end of each strip to
place around the pin. In the 20mm stip, place a break in it at 5mm
from the notched end being sure to keep it attached to the rest of the
handle. Attach the notched end to the front of the handle directly
above the smaller Sprue piece, so that it contacts it, at a 45degree angle
down. Attach the notched end of the 10mm piece to the nub of pin
showing at the bottom of the handle under the larger sprue piece, pointing
out from the front and slightly down. Bend the remaining 15mm of
the long strip down so it touches the 10mm strip, it should leave approximately
a 3mm tounge at the end of the 10mm strip.
When attached, lightly cover the balsa with a coating
of THIN or SuperThin superglue. Taking a needle file or sandpaper,
smooth the balsa as there will almost certainly be stray fibers.
Coating with gloss black will make any imperfections in it VERY obvious
to assist in thier removal. Round the end of the tounge.
Building the HRP/24
Take the 1/16" steel rod (I used a .05" rod, which
comes out a bit thin, so i belive 1/6" SHOULD gain the proper girth) and
from it, cut 24 pieces of 15mm length for the rocket tubes. This
will leave you with a bit over an inch left, so if one is too short you
should have enough to replace it.
At this point you must decide if you wish to take
artistic license with the Rocket Pack, or build as it is seen on the King
Cobra. As the rule book says, many of the weapons come in different
designs from different manufacurers (for those of you that need rationalization
:). If you choose the Design from the King, with two rows of 12 tubes
apiece, you will need to build mounting brackets (which I chose not to
do, and as such you will be on your own). The design I chose allows
for both the HGM, and HRP/24 to be placed on the back w/o any mods to the
Mortar, and no excess work to be done on the HRP. An overhead view
is shown below, note that there are no gaps b/t the tubes, but the spaces
had to be implimented to show the staggering of the first 2 rows.
Also note that the last row of tubes lines up exacly with the row below
it, with an empty space on either end.
______TOP______
/ O O O O O O O \
/O O O O O O O O O\
\ O O O O O O O O /
\---------------/
BOTTOM
1 2 3 4 5 6 7
1 2 3 4 5 6 7 8 9
1 2 3 4 5 6 7 8
The easiest way to accomplis this pack is to start
with a piece of lead flattened to about 1/16". Make a sheet that
will be a bit larger than the tubes when assembled. Lay one tube
down on the lead, and superglue it in place. Take the next and glue
it in place against the first tube. Do this until you have a row
of 8 rocket tubes assembled. To start the second row, place a tube
between tubes 1 and 2 on the bottom, and glue in place with a small bead
of glue near the middle, so the tops of the tubes dont appear as a solild
mass. Places tubes 3 through 8 in the same fashion in the middle
row. When those tubes are placed, glue tube 1 from the middle row
on, holding the HRP at an angle so the tube stays in the small groove created
between Bottom tube 1 and Middle tube 2, use the same process at the other
end to glue on tube 9. Next, being extremely careful, hold the Top
tube 1 in exact alignment over the Middle tube 2 and glue in place, again
using the glue in the middle. Proceed to attach, aligning in the
same way, tubes 2 through 7.
Cut the lead backing to end flush with the sides
of Bottom tubes 1 and 9, and the bottoms of all tubes. Then cut so
that the tubes stick up approximately 3mm from the top of the backing.
Now cut a strip of lead 16mm x 5mm and 1mm thick. This will act as
the band which surrounds the rocket pack, and should resemble the shape
shown in the above illustration. The strap will attach as shown in
the lower illustration. Hopefully that helps.
||||
|||||
| \||
| _|
|_/||
|||||
|||||
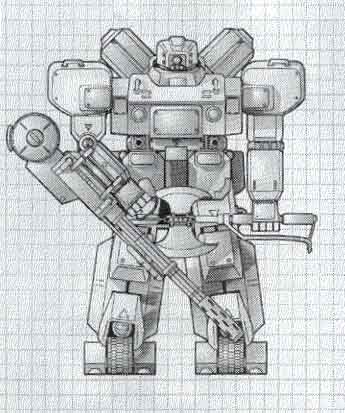
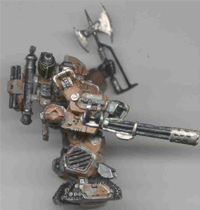
Finally, asseble and paint as normal. Below are pictures of my Finished Panda.


I dont have a Camera so I had to just lay them on the scanner. Any comments or questions can be sent to Nick Church.
* All the Crossbows i've purchased
come with a HGM, you may need to purchase a Grizzly (1206) instead, or
the Mortar Pack (1406), or as I've seen them packaged Heavy Weapons (1407)
** Said to be available in p/n 1407 "Heavy Weapons",
in my experience the Heavy Weapons blisters have been mortars
*** Anything that can be easily formed and will hold
it's shape can be substituted, I used lead as it is readily available to
me