These are the instructions to install covers for Nokia 6100 series phones.
If any questions arise after going through these instructions please feel free to contact us at arthur_nsx@hotmail.comTo install a faceplate, MULTI LIGHT ANTENNA, and blue screen you will need a Torx #6 screwdriver, a flat head screwdriver and the following instrustions to complete the installation

1. Turn off power.
2. Remove Battery.
3. Remove 4 Torx screws using Torx #6 screwdriver as indicated above.
4. Lift bottom of faceplate first then wiggle top off hooks. CAUTION be careful not to lose the speaker below the faceplate.
5. Please skip to # 13 if you are replacing the faceplate. If replacing the back plate or the Circuit Board, remove the 2 Torx #6 screws as shown below.

6. Remove top circuit board and your phone will look like the picture below. If you are installing a Blue circuit board, you have to remove the original LCD display and place it onto the new circuit board by lightly prying the 4 hooks on the LCD display. No other components are required to be removed from the LCD display. Replace the new circuit board and go to step 13 to reassemble the phone.

7. Remove the grey colored frame from the bottom plate and the screw on the bottom circuit board just as below.

8. Once the last circuit board is removed and it just so happens that your phone is the GSM edition, then your phone would look just like the one below. Any other models for the 6100 series would not have a internal battery in the phone.

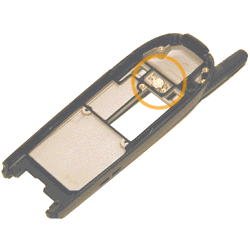
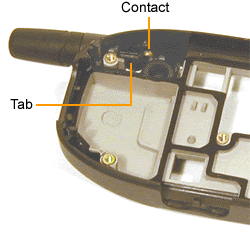
9. If you have the volume button on the side of your phone, remove all the components on the back plate. To remove the antenna press down on the contact strip. Hold the contact down with a screwdriver and press the triangular tab with another. When the tab has been released, pull the antenna out from the top.

10. You are now ready to re-attach components to the new
phone cover. Attach the antenna, the volume control pad and the backup battery unit (see
picture above step number 9) to the back plate of your new phone cover.
11. Attach the bottom circuit board and the screw that holds it in place
to the back plate of your new phone cover. Refer to previous picture(s) if you do not
remember how it is placed.
12. Attach the gray frame and the top circuit board along with the 2
screws that hold it in place.
13. If you are using a new key pad, remove the contact sheet from the
original key pad and attach it to the new key pad. Insert key pad with contact sheet and
power button with speaker piece to new front plate.
14. Be sure to place speaker in correct direction (contact points facing
you while cover is face down).
15. You are now ready to put the phone back together.
16. To install the cover to the body, first attach the infra-red screen
to the top part of front plate. You will need to use adhesive tape to hold the infra-red
screen in place until you attach the front plate.
17. Attach the top part of the front plate to the top part of the back
plate. Be sure to align them properly. After the top has been attached, attach the bottom
parts.
18. While holding the phone together, replace the 4 Torx screws. Do not
over-tighten the screws. Some of the buttons may not work if the screws are
over-tightened.
19. Attach the battery and test phone.
BACK