Upgrading Memory (RAM) in a Mac Plus
An Informational Piece by Mike Bujold
Adding more memory is the best thing you can do to any computer. And fortunately, upgrading older machines can be done for the price of free these days. One reason for this is Apple graciously decided to use standard memory modules in everything from the Plus on upward. This facilitates upgrades quite nicely. Here is the procedure I followed, your mileage may differ.
Getting Started
 For starters, you'll need a Torx T-15 screwdriver. Preferably one with a long shaft, so you can get the screwdriver in those
holes underneath the carrying handle. There are two screws there to undo, plus the two at the bottom, and one behind the
battery cover (5 altogether). Once you have remove the screws, be sure to remove the Reset/Interrupt switch (see picture), or you will have issues. Insert a small slot screwdriver and gently pry it off. Removing the outer shell takes some skill to do it easily, but what works for me is placing the Mac facedown on a soft surface, and slapping the sides in an upward motion. It doesn't take much to pop it loose. (You could pry around the face with a wide-blade slot screwdriver, but if you don't want to cause damage to the casing, I wouldn't recommend it.)
Inside the Mac
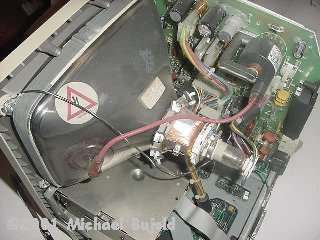
*WARNING* The CRT in the Macintosh can carry a very high voltage. At best, you will get a very nasty shock, at worst, you could die. Leaving the Macintosh unplugged for a day or a week may allow some charge to dissapate. The CRT can also be discharged with a resistor, but if you don't know how to do this (and it is beyond the scope of this article) then I would not recommend it. Be mindful of this, and take care not to make contact with the CRT while working on the Macintosh. Fortunately for this procedure, contact with the CRT can be completely avoided.
 I find all disassembly work is best done with the Macintosh lying face down. Inside, you should see the CRT (monitor), the analog board along the side, (it has the power switch and battery on it), and the
Main Logic Board (MLB) on the bottom. The MLB has a RF shield foil along the bottom. It comes off easily. To remove the MLB, disconnect the wiring harness that goes to the analog board, and disconnect the floppy drive ribbon cable.
Grab the metal screw bracket attached to the board, and slide it up and out.
Place it on a clean static-free surface (preferrably a ESD mat if you have access to one).
A Closer Look at the MLB
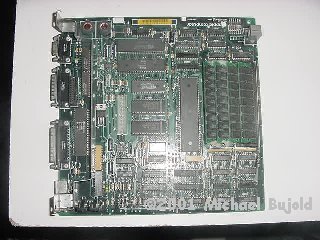
 The Main Logic Board has all the 'brains' of the computer (hence the term 'logic board'). The Mac Plus uses a Motorola 68000 processor. You can't miss it. It
is the biggest chip on the board, and it reads something like "Motorola 68000/8" and a bunch of other stuff. Directly underneath
it are the memory slots. They are tiny Printed Circuit Boards (PCBs) inserted at about a forty-five degree angle. If they are above the
processor, turn the board around. (DUH!)
Upon closer examination, the Memory Modules have 8 chips on them, and thirty pins on the boards on which they are mounted. 30-pin Single In-Line Memory Modules (SIMMs) are an industry standard so finding new SIMMs shouldn't be too difficult.
SIMMs
When looking for SIMMs, keep in mind they have to have 8 or 9 chips on them. Otherwise, the Mac might behave unpredictibly. I attempted several types of 2 and 3 chip SIMMs in my Mac, and the computer kept crashing, and giving me errors. I have as yet been unable to ascertain why. I believe it may have something to do with the type of memory addressing scheme the Mac uses. I have SIMMs with 9 chips that work perfectly in my Mac. The SIMMs should also all be of the same type to eliminate any gremlins caused by using dissimilar SIMMs.
30-pin SIMMs come in 4 flavors - 256k, 1Mb, 4Mb. The Mac only works with the first two. If you have a 1Mb Plus, you
have four 256k SIMMs. SIMMs always work in pairs in the Mac. This means that the Macintosh (Plus) can have
either 512k, 1Mb, 2.5Mb or 4Mb of memory. Decide what you want, and get your SIMMs together. Read the chart, if it helps:
| Amount of Memory | SIMMs |
| 512k | 2x256k |
| 1Mb | 4x256k |
| 2.5Mb | 2x256k, 2x1Mb |
| 4Mb | 4x1Mb |
OK, so, you have your SIMMs. Keep in mind, you must put the same SIMMs next to each other. So, you cannot put a 256k and
a 1Mb in the same row. (The rows run vertically with two slots to a row). To remove your old SIMMs, place your thumbs on the
plastic tabs on either side of the SIMM. Push gently outward on the tabs, and pull the SIMM foreward, up and out. I got too rough with mine, and broke some of
the tabs off. If you do this, don't worry, a hot glue gun should keep the SIMM in place. Just make sure you keep the glue
to the sides of the SIMM, and hold the SIMM down while the glue sets. Obviously, the best solution is not to break them at all, so naturally I would recommend that. Insert the new memory,
placing it with the chips facing outward, and pushing it back gently into the slot. It should click into place and stay put.
Hardware Configuration
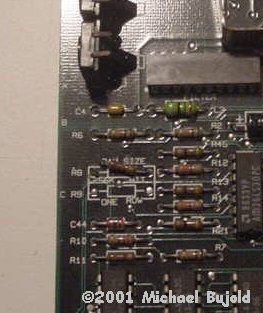
 The memory is installed. Good. There is still another step. We have to tell the hardware to look for more memory. There is a resistor for doing this. On the Macintosh Plus, it is located at the top of the board, just underneath the reset/interrupt switches. It has a white square screen-printed around it. One resistor is labelled '256k bit' and the empty resistor area beneath it is labelled 'One Row'. When the Plus was initally configured with 1MB of RAM, it would have one resistor in the top row, and none in the bottom. If the Plus had only two SIMMs in the first row (512k of system RAM), the resistor would be reversed. For 2.5MB or 4MB, there should be no resistors. With 4MB installed, all that is required is to clip one lead of the resistor. To ensure that it will not short out and cause problems, wrap a small piece of electrical tape around it. Or remove it entirely.
Testing it Out
Reinstall the board, hook it back up and, if you want, put the computer back together. Remember though, if it doesn't work,
then you have to take it all apart again. Since I have no real fear (just respect) for the voltages found in standard computer hardware, I left mine open for the first test. It's probably best to ensure
that computer is not resting on a metal surface of any type. And avoid sticking your hand inside whilst it's on, or even plugged in.
Pop in a boot disk, boot it up, and see what happens. Initally, you will see a white screen for a few seconds. This is normal because the Macintosh is preforming a memory test, and it is just taking longer than usual since there is more memory to check.
After that, the computer should boot up normally, and work fine. But, test it, play a game, write a poem or whatever. Make sure it works before you put it back together. Believe me, it sucks to put it back together, only to find one of the SIMMs wasn't seated properly.
Troubleshooting
You may get a frowning Mac on a black screen with a number like 'F0000' under it. This usually indicates that the computer
couldn't find memory at that address range. If this is the case, then make sure the SIMMs are all seated tightly, and that the
memory resistor is set properly.
Another error I encountered was where the Mac booted properly, but it would then freeze, or halt with a fatal error. Once, I got a 'Co-Processor Not Found' error.
Well, of course there was no co-processor, because, I never put one in. My problem in this case was I was using 2 or 3 chip SIMMs. They will not work in the Mac. It must be 8 or 9 chip SIMMs.
Aside from that, my Mac now works perfectly, with 4Mb as opposed to 1Mb now. I am quite pleased with the way things turned
out. I did have problems initally, but, I sorted them out, like I always do. Remember though, every computer is different. You
may have problems at first, but everything has a solution. (Except where 1 is divided by zero. No solution exists for that.)
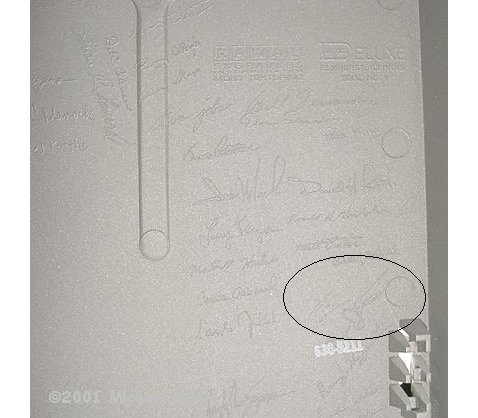
BONUS FACT: Inside the back cover of the Plus are the signatures of the Macintosh design team. Notably, Steve Jobs also signed it, circled below:

 |
home
last update january 26, 2008
|
 For starters, you'll need a Torx T-15 screwdriver. Preferably one with a long shaft, so you can get the screwdriver in those
holes underneath the carrying handle. There are two screws there to undo, plus the two at the bottom, and one behind the
battery cover (5 altogether). Once you have remove the screws, be sure to remove the Reset/Interrupt switch (see picture), or you will have issues. Insert a small slot screwdriver and gently pry it off. Removing the outer shell takes some skill to do it easily, but what works for me is placing the Mac facedown on a soft surface, and slapping the sides in an upward motion. It doesn't take much to pop it loose. (You could pry around the face with a wide-blade slot screwdriver, but if you don't want to cause damage to the casing, I wouldn't recommend it.)
 I find all disassembly work is best done with the Macintosh lying face down. Inside, you should see the CRT (monitor), the analog board along the side, (it has the power switch and battery on it), and the
Main Logic Board (MLB) on the bottom. The MLB has a RF shield foil along the bottom. It comes off easily. To remove the MLB, disconnect the wiring harness that goes to the analog board, and disconnect the floppy drive ribbon cable.
Grab the metal screw bracket attached to the board, and slide it up and out.
Place it on a clean static-free surface (preferrably a ESD mat if you have access to one).
 The Main Logic Board has all the 'brains' of the computer (hence the term 'logic board'). The Mac Plus uses a Motorola 68000 processor. You can't miss it. It
is the biggest chip on the board, and it reads something like "Motorola 68000/8" and a bunch of other stuff. Directly underneath
it are the memory slots. They are tiny Printed Circuit Boards (PCBs) inserted at about a forty-five degree angle. If they are above the
processor, turn the board around. (DUH!)
 The memory is installed. Good. There is still another step. We have to tell the hardware to look for more memory. There is a resistor for doing this. On the Macintosh Plus, it is located at the top of the board, just underneath the reset/interrupt switches. It has a white square screen-printed around it. One resistor is labelled '256k bit' and the empty resistor area beneath it is labelled 'One Row'. When the Plus was initally configured with 1MB of RAM, it would have one resistor in the top row, and none in the bottom. If the Plus had only two SIMMs in the first row (512k of system RAM), the resistor would be reversed. For 2.5MB or 4MB, there should be no resistors. With 4MB installed, all that is required is to clip one lead of the resistor. To ensure that it will not short out and cause problems, wrap a small piece of electrical tape around it. Or remove it entirely.

