1983 Toyota Tercel
[Engine Mechanical]-Emmission Control System-Fuel System-Cooling System-Lubrication System-Ignition System-Starting System-Charging System-Clutch-Transaxle-Propeller Shaft-Front Axle and Suspension-Rear Axle and Suspension-Brake System-Steering-Body Electrical System-Body-Air Conditioning System
Trouble Shooting-Engine Tune-Up-Idle HC/CO Concentration Check Method-Compression Check-[Timing Belt]-Cylinder Head-cylinder Block
TIMING BELT

PREPERATION FOR REMOVAL
- REMOVE RADIATOR
- IF VEHICLE HAS POWER STEERING, REMOVE VANE PUMP DRIVE BELT
- IF VEHICLE HAS AIR CONDITIONING, REMOVE COMPRESSOR DRIVE BELT AND IDLER PULLEY BRACKET
- Loosen the idler pulley nut.
- Loosen the adjusting bolt and remove the drive belt.
- Loosen the alternator lower mount bolt and press the alternator to the fender apron side.
- Remove the idler pulley bracket with the pulley.
- REMOVE AIR CLEANER
-
REMOVAL OF TIMING BELT
- REMOVE DRIVE BELTS AND WATER PUMP PULLEY
Remove the water pump and alternator drive belt. - REMOVE CYLINDER HEAD COVER
- Disconnect the PCV hose from PCV valve.
- Remove the cylinder head cover, gasket and half circle plug.
- REMOVE CRANKSHAFT PULLEY
- Set No. 1 cylinder at TDC/compression.
Turn the crankshaft pulley until the timing mark is aligned with the TDC mark.
NOTE: Check that the rocker arms on the No. 1 cylinder are loose. If not, turn the crankshaft one full turn. - Secure the camshaft and remove the pulley bolt.
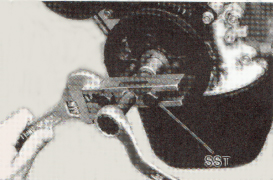
- Using SST, remove the pulley.
SST 09213-31021

- REMOVE TIMING BELT COVERS AND GASKETS
- REMOVE TIMING BELT GUIDE

- REMOVE TIMING BELT AND IDLER PULLEY
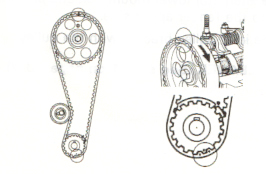
NOTE: If reusing the timing belt, draw a direction arrow on the belt (in direction of engine revolution), and place matchmarks on the pulleys and belt as shown in the figure.

- Loosen the idler pulley bolt, push it left as far as it will go and then temporarily tighten it
- Remove the belt.
- Remove the idler pulley bolt, pulley and return spring.
- REMOVE CRANKSHAFT TIMING PULLEY
- REMOVE CAMSHAFT TIMING PULLEY
Secure the camshaft and remove the camshaft timing pulley bolt.
INSPECTION OF COMPONENTS
- INSPECT TIMING BELT
If there are defects, as shown in the figure, check the following points and replace the timing belt if necessary.
- Premature severance
- Check for proper installation.
- Check the timing gear cover gaskets for damage and check installation
- If the belt teeth are cracked or damaged, check to see if the camshaft is locked.
- If there is no noticalbe wear or cracks on the belt face, check to see if there are nicks on one side of the idler pulley lock.
- If there is wear or damage on only one side of the belt, check the belt guide and the alignment of each pulley.
- If there is noticeable wear on the belt teeth, check the timing gear cover gaskets for damage and check the installation of the gaskets.
- INSPECT IDLER PULLEY
Check the turning smoothness of the timing belt idler pulley.
INSTALLATION OF TIMING BELT
- INSTALL CAMSHAFT TIMING PULLEY
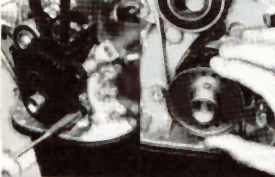
- align the camshaft knock pin and camshaft timing pulley.
- Secure the camshaft and tighten the camshaft timing pulley bolt.
Torque: 400-550 kg-cm (29-39 ft-lb)
- Align the bearing cap mark and the center of the small hole on the camshaft timing pulley.
NOTE: Remove any oil or water on the camshaft timing pulley and keep it clean.
- INSTALL CRANKSHAFT TIMING PULLEY
Install the crankshaft timing pulley and a lign the TDC marks on the oil pump body and crankshaft timing pulley.
NOTE: Remove any oil or water on the crankshaft timing pulley and keep it clean.
- INSTALL TIMING BELT IDLER PULLEY
- Install the timing belt idler pulley and tension spring.
- Pry the timing belt idler pulley toward the left as far as it will go and temporarily tighten it.
NOTE: Remove any oil or water on the idler pulley and keep it clean.
- INSTALL TIMING BELT
NOTE: If reusing the timing belt, align the points marked during removal and install the belt with the arrow pointing in the direction of engine revolution.
- CHECK VALVE TIMING AND TIMING BELT TENSION
- Loosen the timing belt idler pulley set bolt.
- Temporarily install the crank pulley bolt and turn the crankshaft two revolutions from TDC to TDC.
NOTE: Always turn the crankshaft clockwise.
- Check the valve timing.
Insure that each pulley aligns with the marks as shown in the figure.
- Tighten the timing belt idler pulley set bolt.
Torque: 300-450 kg-cm (22-32 ft-lb).
- Measure the timing belt tension as shown in the figure.
Timing belt tension: 6-7 mm at 2kg (0.24-0.28 in. at 4.4 lb)
- If the measured value is not within standard, readjust with the idler pulley.
- Remove the temporarily installed crank pulley bolt.
- INSTALL CYLINDER HEAD COVER
- Install the half circle plug and cylinder head cover with gasket.
- Connect the PCV hose to the PCV valve.
- INSTALL TIMING BELT GUIDE
- INSTALL TIMING BELT COVERS WITH GASKET
- INSTALL CRANK PULLEY
Install the crank pulley, secure the crankshaft and tighten the retaining bolt.
Torque: 1,100-1,300 kg-cm (88-94 ft-lb)
NOTE: Apply a light coating of engine oil on the bolt threads and under the bolt head before installing.
- IF VEHICLE HAS AIR CONDITIONING, INSTALL IDLER PULLEY BRACKET WITH PULLEY
- IF VEHICLE HAS POWER STEERING, INSTALL VANE PUMP DRIVE BELT
- INSTALL WATER PUMP PULLEY
- INSTALL DRIVE BELTS
Install and adjust the drive belts.
Drive belt tension:
New belt 125 +/- 25 lb
Used belt 80 +/- 20 lb
(w/Borroughs belt tension gauge No.BT-33-73F)
- INSTALL AIR CLEANER
- INSTALL RADIATOR
- START ENGINE
- Check for leaks
- Make engine adjustments as necessary.


