|
|

Quill or Bobbin Winder
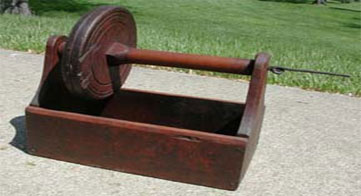
This quill winder is probably Eastern European in origin. A quill, which in this country in early days was often made from either corn husks or hollowed elderberry stalk, was slid onto the metal spindle and then rotated by turning the wooden shaft. The large wooden wheel functions both as a flywheel to keep the momentum going and a means to spin it. Quills, when full, were then placed in shuttles for weaving.
Its condition was rather rough so Jim refinished this in a John C. Campbell Folk School class on refinishing wood.
These are sometimes seen advertised on internet auctions as spinning wheels, but we can't vision spinning miles and miles of thread or yarn using this piece.
|

Bobbin Winder
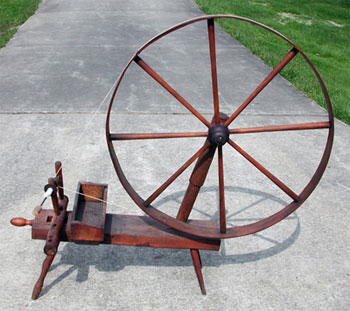
When we purchased this item it was tagged as a bobbin winder and granny spinning wheel.
The horizontal member that holds the uprights that hold the spindle is about 12 inches long. The uprights can be arranged to accommodate both spools for a warping scarne and quills for weaving shuttles. The box would have been handy for holding the empty and wound quills.
The wheel is definitely shorter compared to a normal walking wheel, hence the term granny spinning wheel. The operator needs to be seated to use this wheel. An indicator that the wheel can be used for spinning is the tip of the spindle. A spinning wheel needs a spindle with a point, while a bobbin winder will have a blunt end.
|
Heddle Horse
The heddle horse is used to make knitted string heddles. It is missing one an upright T. The harness sticks were slid into the slots on the outside of the T and a round dowel was inserted in the center hole. A ball of string would be knotted from one harness stick, around the center dowel and over to the other harness stick. When all the heddles had been made, the dowel was removed and he harness hung on the loom. Apparently knitted heddles are made with one length of string while knotted heddles are made individually. We haven't found instructions on exactly how this is done, and would like to eventually put harness like this on the rocker beater loom.
When we purchased it, the antique dealer said it was a leather maker's bench. Someone must have told the dealer that the device was used to make harness, and we suppose he knew only about harnesses for horses. Obviously he didn't understand that harness could be on looms as well as on horses.
Temples
|
 |
|
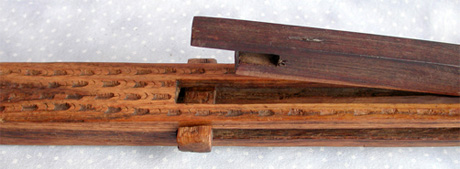
Temple above is in the closed or working position and below shows the internal locking mechanism, a slot and hand carved peg.
|
 |
|
Temples are used to keep the loom-woven work at a consistent width. The very act of pulling weft threads through the shed and packing them in can cause the work to shrink in width. A weaver needs to allow enough slack in the tossed shuttle thread to travel over and under the warp threads. Not allowing for this increase in distance causes the left-to-right dimension of the work to shrink.
Tape and inkle loom weavers allow for this by allowing a small loop at the edge (selvedge) and by tugging on the ends as they proceed with the weaving. The size of loop needed for maintaining a nice edge is part of the craft which must be learned through practice. Wider width weavings will have either an angle of thread or a curve of thread across the shed before it is packed in.
Temples are an aid for the weaver to maintain consistent width. They act much like a rug-stretcher. They are particularly helpful when weaving rag rugs as the shortening of weft thread is more pronounced because of the bulk of rags.
Temples have five important parts: There will be two arms generally made of wood. The tip of each arm will be equipped with teeth of some sort--usually several small brads or nails, pointy side out. And the temple will have some means of fastening the two arms together at several widths.
|
 |
|
While teeth are fairly standard, several creative methods have been seen for keeping the two arms tied together and are seen here. The item above uses a wing nut on a bolt through a set of holes which provides a friction fit.
The action of some temples is much like scissors. The arms are formed into an "x" and the teeth are inserted into the work near its edge. Downward force is applied to the pivot until the arms lie parallel and the teeth have stretched the work to its proper width. The arms are then secured in this state by string or a door latch (or both) as seen below
|
 |
 |
|
 |
|
The temple pictured above and below shows signs of good craftsmanship as well as caring for how the product appeared. The maker of this temple used sapwood for one arm and heartwood from a walnut tree for its other arm giving the work a nice two-toned look.
In addition to having all the right parts, the maker chip-carved decorations in the wood. This item was advertised as a "primitive wood gadget."
|
 |
|
When the temple has been flattened, the small mortise and tenon are engaged for a permanent setting.
|