Description
TIFF Info is a small tool primary intended
to people working in pre-press industry.
It's primary goal is to detect TIFF's
file color mode. Hope it will be useful.
The utility was inspired from my job. I
often fall in situation when I'm wondering
does all images in current publication
are converted to CMYK or not? To be or
not to be? TIFF Info solves that problem
with TIFF files. Of course there is another
similar products which are feature richer
than TIFF Info - they can check wide range
of image formats, check for musing fonts,
etc. but they cost money. TIFF Info is
small, fast, does not consume a lot of
memory and it's FREE OF CHARGE. More precisely
- it's distributed under GNU public license
(see http://www.gnu.org/licenses/licenses.html).
TIFF Info encapsulates the specification
of TIFF Revision 6.0 (June 3, 1992) which
can be found at Adobe's web site (http://www.adobe.com/Support/TechNotes.html).
However I've noticed some differences
between this specification and TIFF files
written by Adobe Photoshop 5 and 6 - TAGS
for JPEG compression, copyright info,
etc.
I was unable to find specification of JPEG
file format. If someone knows where it's
available please send me mail - I will
extend TIFF Info to TIFF/JPEG Info.
One of requirements of GPL is source code
availability. This package includes and
installs TIFF Info 1.1 Sources.zip file
which contains sources (Delphi 6, probably
will be compiled OK with Delphi 4 and
5).
TIFF Info is written and tested under Windows
98. It should work correctly under any
other 32 bit Windows (95, ME, NT4, 2000,
XP) but it's not tested.
TIFF Info comes with NO WARRANTY. Use it
at YOUR OWN RISK. The author is not responsible
for any damages and/or data loss on any
computer systems running TIFF Info. For
more details please read GNU Public License
as mentioned above.
Comments and bug reports are welcome at
same e-mail address.
Top of
the document
The Main Window
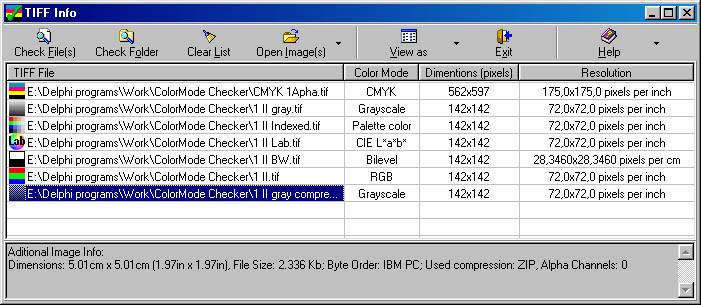
Here is the screenshot of TIFF Info's main
window:

The interface is simple. The toolbar buttons
provide a few simple tasks for checking
and opening TIFF files. The list box shows
checked files with a specific icon, full
path and file name, color mode, physical
dimensions in pixels and horizontal and
vertical resolution. Additional information
(such as dimensions in centimeters and
inches, file size, byte order, compression
and alpha channels) for current image
is provided in the bottom panel.
If you don't want captions of the buttons
right click anywhere in toolbar and choose
"Hide button's captions". Showing
them is similar.
The icons:
 - the image is in Bilevel (aka Bitmap)
color mode;
-
 - the image is in Grayscale color
mode;
 - the image is in Palette color mode;
 - the image is in RGB color mode;
 - the image is in CMYK color mode;
 - the image is in CIE L*a*b* color
mode;
 - the image is in Class Y color mode;
 - the image is in unknown color mode.
TIFF Info provides two ways for checking
files
- Checking
one or multiple TIFF files
- Checking
all TIFF files in specified folder
See next two sections for details.
Repeating any of these two methods does
not clears the list of previously checked
files. This can be done via  button.
Top of
the document
Checking one or
multiple TIFF files
Click  button. You'll see a standard open window
where you can select one or more TIFF
files (use Shift or Ctrl keys for multiple
selection).
HINT! If you receive TIFFs from Macintosh
they may be without ".tif" extension.
You don't need to rename them. Just change
"Files of type" to "All
Files" and use them. TIFF Info will
detect are they TIFF files or not.
Top of
the document
Checking all TIFF
files in specified folder
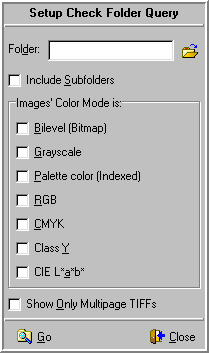
Click  button. You'll see a simple form where
you can set your criteria.

Specify desired folder either typing it's
full path or using  button. Specify whether subfolder should
be included or not. Set desired Color
Mode - TIFF Info will show you only these
TIFF files matching selected color mode(s).
Check Show Only Multipage TIFFs check
box and the result list will contain only
TIFFs with more than one page (IFD - Image
File Directory). Click Go.
Top of
the document
Opening images
in image edit application
Click  button. If you never set up which application
(like Adobe Photosop, etc.) should be
used for this task you'll be prompted
to specify it. Otherwise this application
will be launched and all images you select
in the list box will be open there. If
you would like to change the application
use buttons' drop down menu and choose
"Choose Image Editing Application".
Top of
the document
Arranging the view
of list box
This is similar to Windows Explorer. Use
 button or right click in the list box
and choose desired view style.
Top of
the document
Getting Help
Click  button or press F1 key. The button's drop
down menu also provides About command.
Top of
the document
Installing TIFF
Info
Use the supplied setupTIFFInfo1.1.exe and
just follow the instructions. Setup process
will offer you to install TIFFInfo in
subfolder of your windows' programs folder
(e.g. c:\Program Files\TIFFInfo 1.0).
Setup will create a program group in Windows
menu. After the finish TIFF Info will
bw automatically launched. Setup does
not write any extra data in the system
registry (except those Windows writes
for any installed application) and/or
any files outside the folder that you
specify at setup process. The setup process
adds Uninstall feature which can be used
to uninstall TIFF Info. See the following
section Uninstalling
TIFF Info.
TIFF Info can be used without install package.
Just copy the contents of it's folder
and run it. Note that in this case the
automatic uninstall will not work!
Top of
the document
Uninstalling TIFF
Info
You may use two methods yo uninstall TIFF
Info.
- Choose Uninstall from TIFF Info's
program group or
- Start Add/Remove Programs control
panel, select TIFF Info 1.0 and click
Remove button. If you've run TIFF
Info at least once there will be TIFFInfo.ini
created for you. You'll be prompted
to delete this file.
Top of
the document
Bugs
Not reported yet.
If you encountered any bug e-mail me it
with a short description how it was raised.
Top of
the document
|