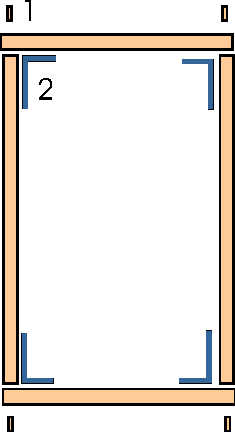
4 pieces of pine hard wood or any other hard wood available,4 cm x 3.5 cm (1 1/2 x 1 3/4" ) two of those 85 cm (33 1/2" ), the other 2 pieces 75 cm (29 1/2") long. The longer pieces of wood are the height, the shorter ones for the width of the frame.
For the small frame we used the same thickness wood with height 70 cm (27 1/2") and width 56 cm (22") If you make the smaller frame adjust the length of broomsticks and board to the frame width.
Wood dowels, woodwork glue, 4 large metal corner brackets (with at least 3 screws on each side)
To make the frame, David drills a hole from the top, to connect the 2 pieces with a wood dowel each, - see drawing, do this on all 4 corners and apply wood work glue( 1 ) before inserting the dowels. Then fasten one metal corner bracket with screws into each corner ( 2 ).
What else do you need:
2 pieces of plywood, 8 cm (3")wide,18 cm (7") long and 1/2 to 3/4 cm (1/4") thick,
craft matches, more wood work glue and 2 bolts with washers and nuts,
One 1.5 cm (1/2") wide and 80 cm (31 1/2") long dowel rod,
2 flat 2 cm (3/4") wide flat dowel strips, 80 cm (31 1/2") long.

He puts the strip into the cut out, flush with the back of the frame, and drills a hole through the strip and the frame big enough to put the bolt through. Bolt both pieces to the frame putting the bolt from the out side to the inside of the frame. Add washer and turn nut tight. On the other side of the plywood strips, mark the middle of the width and measure 2 cm (3/4") in from the edge. Then drill a larger hole (woodwork drill bit) to put the 1.5 cm ( 3/4") dowel rod trough it (tight fit). Insert the dowel into both ply wood strips so that it sticks out at each side. see photo.

We make our own reed from the 2 flat dowel strips, craft matches and wood work glue.
First I calculate how many warps per inch I want to have. Then I work out how many divisions I need per inch and mark the warp ends along the edge of a paper.Then I use this marked edge, laying it along the middle of the flat dowel and mark the positions with a 1 cm (1/2") long pencil line each. I do the same with the second dowel. If your epi is above 8 you need to divide the amount of warp ends in half - 10 epi=5 marks per inch, 12 epi=6 marks per inch and sley the reed with 2 warps each. This is to ensure that there is enough space between the matches for the warp. I work at 12 epi and that works well.
Then I position both dowels side by side with about 2.5 cm ( 1") distance from each other (If you craft matches are shorter put the dowels a little closer together). I use a heavy brick on each end to keep them in place. Now I run a line of woodwork glue about 10 cm (4") at the time from the edge of the dowel along the length of the dowels across the pencil marks (on both dowels) and then place the match sticks on the pencil lines which I have marked. Then apply the next 10 cm of glue until I reach the end of the dowels.
Let this dry until the following day. Then apply another layer of wood work glue on top of the matches, also filling the spaces in between matches with glue. Leave to dry for another 24 hr. Then the reed is finished and can be used. Mine last for years!
To find out what else you need to set the frame up and how to do it click here.


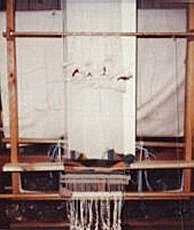
DIYloom with sampler tapestry.