Trizza's Clisby Lathe Diary
Here I intend to write about my
experiences with the Clisby Metal Lathe. I am writing this from the
point of view of a rank beginner, and I will be including how-to's and
tips for doing everything from the most basic of procedures, up to
modifications and attachments I will be building. When I started I
found an extreme lack of information for beginners with this lathe, so
I decided to document my experiences in the hope that it may help
others that wish to get into this hobby!
It is a work in progress so stay tuned!
Purchasing
The first thing I did was order in a book from Plough Book Sales - "The Amateur's Lathe" by L H Sparey. While it mainly deals with the larger 7.5" lathes, many of the techniques and concepts scale well to the Clisby lathe. I recommend it to any other beginners out there.
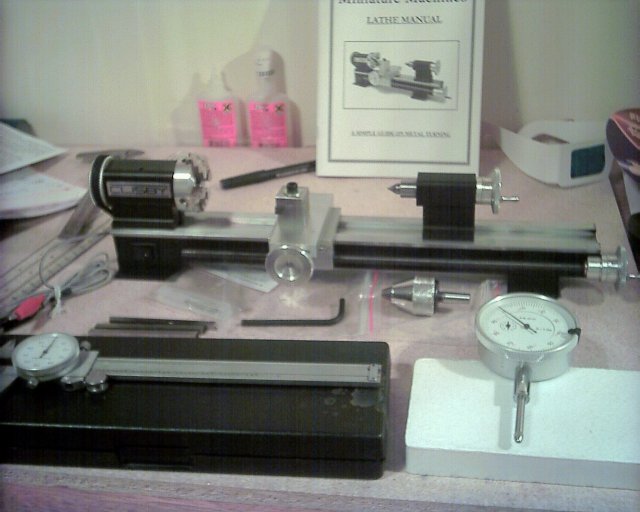
I then checked out a few tool stores in my area and found that I could buy everything I needed within 5-10 min drive of my place. On the big day I first visited my local tool store and bought:
Mounting
After thoroughly reading the manual several times I set about mounting it. A quick rummage through my shed discovered a nice 1/2" thick piece of laminex coated wood. I pulled out the jigsaw, made it look a bit neater, and sanded the edges. I marked out for the mounting holes and drilled these. I countersunk them on the underside. Finding that I had no suitable bolts for mounting I drove to the hardware store and bought these. While I was there I also purchased some safety glasses (VERY important! Don't try machining without a decent pair) and some nice looking brass bolts to practice on.
Mounting was a reasonably simple affair. I used cardboard as packing under the feet, and put the bolts through from the underneath. These needed to be shortened, and I had to remove the motor to be able to tighten them. The pair at the headstock end were tightened all the way, and the pair at the tailstock end were left finger tight. This is to prevent distortion of the bed.
First snag
I then noticed that the saddle leadscrew would not rotate! No matter what I did, I could not get it to turn. I thought about this for a while, and eventually undid the screw holding the handle to the bed (on the inside of the tailstock end of the bed) and removed the leadscrew totally. I held the section thats meant to be stationary in my vice and applied a large force to the handle - I heard a sharp cracking sound and the leadscrew started to rotate. After finding out more about how these lathes are constructed I'm now pretty sure that during assembly some of the loctite used to hold the handles together managed to get into the gap between the handle and the stationary part. Anyway, I oiled it liberally and worked it back and forth for a few minutes, clearing the gunk that came out of the gap. Its still a little stiff but it works great - its only a pain if I'm winding the saddle from one end of the bed to the other. I reassembled it all and decided it was time to give it a shot!
First cuts
I used an F-clamp to hold it to the bench a little more firmly and dug out my power supply. I'm using an old PC power supply I pulled out of a 486. I found the +12V and ground wires, hooked it up to the lathe and plugged it into the wall. I put some oil in the oiler hole and oiled the leadscrews. On went the power, and I flicked the switch while holding my breath. It ran! With a big grin on my face I decided it was time to take some test cuts. I grabbed one of the brass bolts and put it in the chuck. I spun the chuck a few times by hand checking to see how true it was running and to my amazement it was pretty much perfect. I got lucky - its not normally this easy with a 4-jaw chuck! I donned my safety glasses and positioned the tool to take a very shallow first cut on the head of the bolt. I flicked on the power and slowly advanced the saddle towards the chuck. My first cut barely skimmed it and took off very little metal. I wound it back again and wound the cross slide further in. This time I took off a little bit more metal. Chips of brass went flying. I was making chips! I proceeded to turn the head of the bolt down to half its original diameter and then faced it too.
There we have it! I'd taken my first tentative steps into the all new realm of hobby machining. Stay tuned for more!
Back to the index
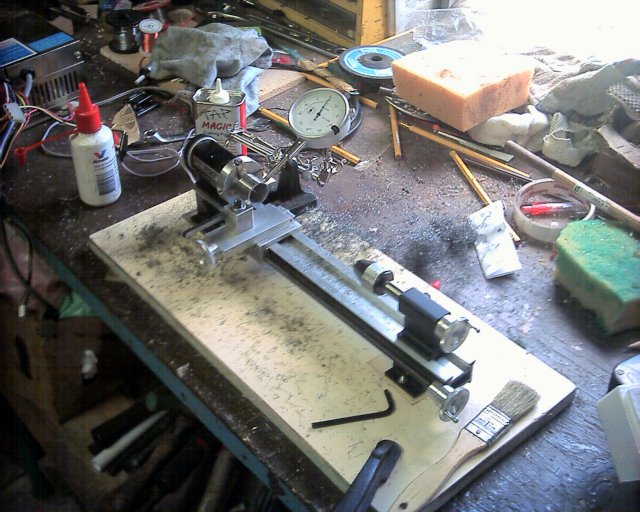
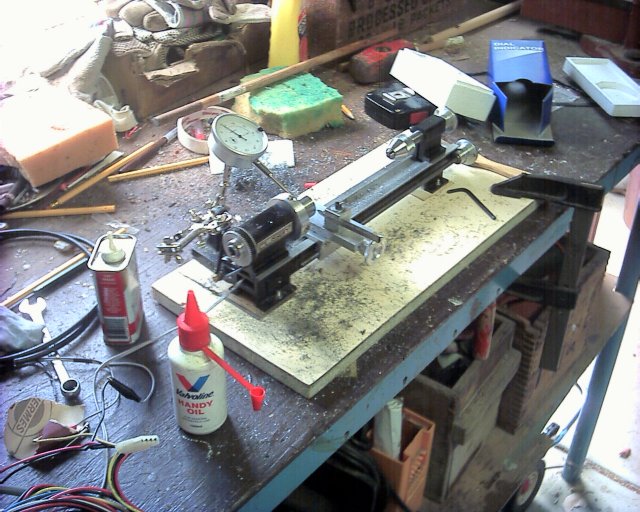
Rotor cans for brushless outrunners (eg CD ROM motors) require steel outsides to reduce losses. This meant I had to machine steel with my little lathe. I found some galvanised tube at the scrapyard of a suitable inner and outer diameter to be a starting point. I hacked off a section and chucked this in my lathe. A few minutes with the dial indicator had it centred. Below is a photo of my setup for doing this. I use a "helping hands" device to hold the back of the dial test indicator, positioned in such a way that the end is perpendicular to the surface of the work, under tension. This means that when I rotate the chuck (by hand! Do not switch on with the indicator in place!) I can see the needle move either to the left or right showing deflection. I can then adjust the jaws to shift the work in the required direction to centre it. Once satisfied with the placement I tighten the jaws (do not over-tighten them - you can damage the jaws) and check the centring once more. I then put the indicator away to avoid damaging it while turning.
Note - due to the large diamater of this workpiece I gripped it using the ouside of the jaws on the inner diameter of the pipe rather than the inside of the jaws on the outside of the work. Otherwise the jaws need to be reversed and the saddle cannot be traversed all the way under the chuck as the jaws will strike it (I found this out the hard way).
Facing and steel turning tools
Now that the work is set up, it is time to set up the tool. I found that the easiest method to machine steel on this lathe is to use an *extremely* sharp bit. Grind it until it is as sharp as you can get it. Put it back in the toolpost with only the minimum amount out the front as possible - this reduces possible flex and stresses on the machine to a minimum. I start by setting the tool at a 45 degree angle for facing the work. As I use a right hand bit (for cutting towards the chuck) I face from the centre out. I have tried it both ways and I find this easier. Move the tool bit to the centre (in the case of my pipe I move it to just past the inner diameter), switch on, and take a very light cut outwards. Wind back to the start of the cut, advance the saddle a few thou and take another light cut. With steel it helps to put some cutting fluid on the work and tool bit. Take it slowly, be patient, and you'll be rewarded with a nice finish. Continue this way until the entire surface has been machined flat. The surface has now been faced!
Turning an outer diameter
Time to machine the outer diameter of the pipe. Start by setting the tool just beyond the end and just outside the outer diameter. Switch on, and advance the tool slowly towards the chuck. It should barely skim the work. Return to the end, and advance the cross slide by 2 or 3 thou. This is very important with steel as taking deeper cuts than this will most probably stall the motor. Again traverse the work slowly, and hopefully you will take off more material. Continue this process until the work has been trued - this means that the entirety of the outside has been machined. You can then continue turning the diameter down until you have reached your target diameter. You will find that keeping the workpiece and tool bit lubricated with cutting fluid will make the process easier and the cuts cleaner. Make sure to regularly oil the headstock and clear chips from the ways. This is very important as steel chips will damage the ways if left there. Taking these precautions should hopefully result in a long life of your machine.
Turning an inner diameter
With the outside diameter turned it is now time to turn the inside diameter! This requires a boring tool. These are tricky to grind, but the pictures available at this site should help (thanks Mark!). I do this just like the outer diameter but starting from the inside and working towards myself. Take shallower cuts, and sometimes it pays to repeat cuts on the same setting - this accounts for spring in the tool. Work your way out until the inner diameter has reached its target.
Thats all for tonight folks, check back later for more news.
Back to the index
Drilling
This is the method I used to drill the 1/8" centre hole. I'm not sure if this is the best way to do it or not, but it turned out farbetter than my previous experiments with drilling did.
I removed the chuck from the lathe and wiped down a clean, flat spot for me to set it down. I located the centre of the wheel and centre punched it lightly (so as not to put much strain on the chuck). I then put the chuck back on the lathe, mounted the Jacobs chuck in the tailstock, and put the centre drill in the chuck. I pushed the tailstock up close to the work and locked it in place. On went the power and I gently rotated the tailstock handwheel - advancing the poppet and drill. The centre drill immediately found the point I had centre punched and drilled into it. After allowing the taper of the drill to enlarge the hole a little I swapped the drill to a 1/16" bit. This requires you to go slowly and patiently. I lubricated the drill bit with cutting fluid which seemed to smooth things a long a bit. Every now and again I retracted the bit and cleared the brass chips from the bit, lubricated it again, and kept drilling. When it got to the point where the poppet was extended quite a long way I retracted it, shifted the tailstock closer to the chuck (so that the bit started inside the workpiece) and continued drilling. Eventually I was rewarded with the sound of the motor unloading as I broke through the other side. I replaced the drill with a 3/32" bit and drilled through again. I repeated this until I had drilled through with a 1/8" bit.
Finishing
I faced the front lightly again to remove the lip that the drilling had left behind. To finish this side off I held a file to the outer edge to bevel it slightly, and then held sandpaper to the wheel where it had been machined. I then reversed the paper and used the non-abrasive side to polish it slightly. While it is still possible to see tool marks, it is quite shiny and feels extremely smooth. A good enough finish for my first project I thought, so I moved on. I loosened two jaws ever so slightly, flipped the wheel around and tightened the jaws again. A quick facing cut and some filing and sanding had the job completed!
Heres what I ended up with:
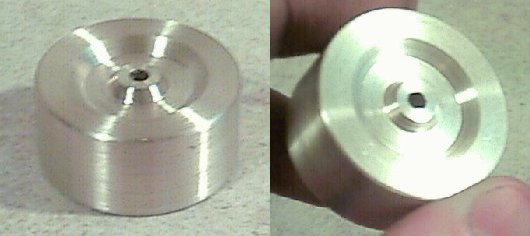
I'm quite proud of how well this part turned out, and barring unforseen difficulties this should make it into the final engine. Next up? The piston! Stay tuned for more, hopefully I will complete the piston tonight.
Back to the index
Turning a long thin shaft
I rechucked it with the head of the bolt only just beyond the chuck jaws and faced off the socket for the screwdriver. I then centre drilled it, and gripped the very end of the bolt in the jaws, with the dead centre in the centre hole I'd made. I locked the tailstock and wound the poppet forwards until it was a firm fit and then locked the poppet. I switched the lathe on and noticed it was running a lot slower than usual - a drop of oil on the dead centre fixed this. I proceeded to turn it down until the threads were gone and measured it - 0.175"! Too thin for a 3/16" piston. I quickly took stock of my selection of drill bits (quite a few missing, I need to buy a new set) and found that the next smallest bit I had was 1/8". I thought about this and decided I might as well try to modify the design for a 1/8" bore. I don't know how well it will work but I can always build a new one if it doesn't run - it will be a good exercise in machining.
Anyway, I finished the rod by holding sandpaper to it and then a rag. It is reasonably smooth now.
Parting off to length
My nice 1/8" shaft turned out to be 2" long and I only wanted a 1.6" length. I didn't want to hacksaw it off, so I ground up a parting tool and used that! At the point it has a width of about 1.5mm and it tapers in slightly at the sides and front to give clearance. I set it up so the tool just poked out of the toolpost, and the point to be cut was barely clear of the chuck jaws. I very very slowly advanced the bit into the workpiece at the point to be cut, using cutting fluid. Moving slowly this took a nice square cut out of the piston. The remaining material got thinner and thinner until only a thin spigot was left, which then broke and the leftover dropped gently to the cross slide. It left a nice flat face on the cut piece, with a small bump that was easy to file off.
Drilling the crank pin hole
Unfortunately I didn't take any pictures of this stage, as it may be hard to explain. First of all I marked the rod where the crank pin hole had to be. I laid the rod flat across the face of the chuck (jaws loosened quite a way) so that it was approximately centred. I then tightened two jaws on one side of the rod so that they formed a horizontal platform to rest the rod against. I tightened the other two up so they nearly gripped the rod, but still allowed me to shift it. Dead centre went into the tailstock, and this was brought up to the workpiece and the tailstock locked so that I could see where the centre of the work was. I adjusted the rod's position and the jaws until the dead centre was in line with where the crank pin hole needed to be, tightened the jaws up, and replaced the dead centre with the centre drill. On went the lathe, and I started the hole with the centre drill. I then used a 1/16" bit to finish the hole all the way through.
Finishing
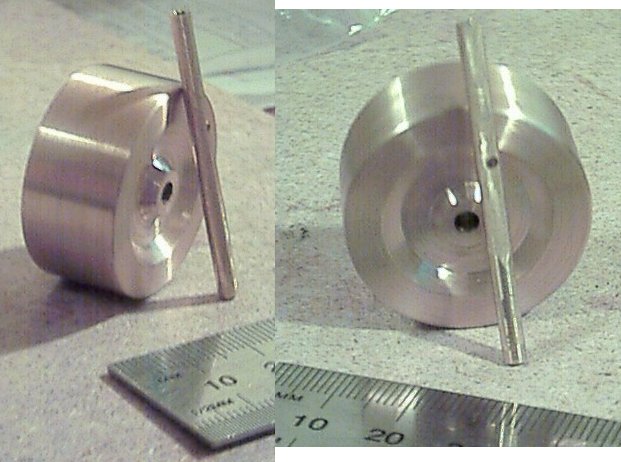
The plans call for one or both side/s of the piston to be milled flat to allow clearance for the crank disc, however I do not have any milling capabilities just yet. To do this I put the piston lightly in my vice so that it was reasonably square and filed it flat. I haven't filed it much yet, as I need to draw up the engine in CAD first to determine exactly how much filing I need to do.
Heres the finished product with the flywheel and a rule to give some scale:
Back to the index
Cylindrical
goodness
After consulting Dave about the suitability of my 1/8" piston, I used
Autocad to draw up a new cylinder based on the materials I had
available. I have plenty of 1/4" aluminium plate so I decided to use
that. I ended up with a piece 1" * 1/4" * 5/16". I hacked this chunk
off and filed it roughly to shape, and then carefully filed the
appropriate side perfectly flat. I marked out and centre punched the
bore, and located it in my chuck. This was quite difficult to grip
well, but I ended up with the end of a jaw on each of the four sides.
Centre drilled the punch mark, and then drilled it, slowly increasing
the bit size until I had drilled it 1/8". To get the correct depth I
wrapped a piece of masking tape around the bit where I needed to stop.
Then I tried inserting the piston into the bore and found it wouldn't
go in very far! I'd machined the piston *slightly* oversize, so this
didn't come as a surprise.
Crude lapping
To overcome this I put the piston in the Jacobs chuck, coated it with cutting fluid, turned the lathe on and advanced it into the bore. I was soon able to put it all the way in. I then unlocked the tailstock and slid the piston in and out of the bore with the lathe on, simulating the motion of the piston in action. After stopping the lathe I found that I could easily move the piston in the cylinder and that there was little to no side to side play in the motion. I guess this was a primitive lapping technique - to truly lap it I would've used an abrasive compound.
Final steps
Once I was satisfied with the fit of the piston in the cylinder I marked out the pivot and air holes and centre punched them. I then set it up in the chuck similarly to how I set up the piston, centre drilled and then drilled through with a 1/16" bit. I made sure to only go halfway through by regularly stopping and looking down the bore to see if I'd broken through. I was quite pleased with the depth of the bore and positioning of the air hole, as the bit cut a depression in the bottom of the bore - just as planned. I was able to wash the swarf out of the holes by pouring water into the 1/16" holes.
Heres a group photo of the parts so far:
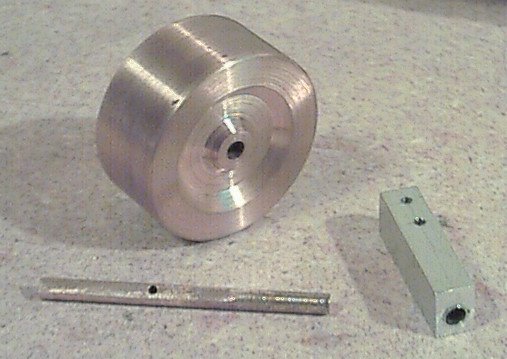
Out of interest I just loaded the piston into the cylinder, sealed my lips around the end and blew into the air hole - the piston shot out of the end. I'm pretty happy with the fit of these two parts at the moment!
Next job? Probably the frame. The end is in sight! Only another 2 parts to make. I've probably spent about 9 hours so far on this engine, but most of that has been thinking about techniques. I could probably build another one in half that time or less, especially if I had some better drill bits. I might have to splash out for a nice set...
This is great fun :)
Back to the index
First up I faced the end of the bar and turned it down to a diameter of 0.55". Note I was still supporting the work with the dead centre, so I couldn't machine the entire face. Next I started to work on the 0.25" diameter - to do this I started removing material along the whole bar excepting the 1/16" at the very end. I went to a depth of about 0.35" with the right hand tool, meaning I had a taper down to it from the end (due to the clearance angle on the bit). I decided that it would be best to drill the crank pin hole before I'd removed too much material, so I offset the piece in the chuck so that a point on the correct diameter was at the centre of rotation. I then centre drilled this and ran it through with a 1/16" bit. During this time there was a lot of vibration due to imbalance in the chuck - I just clamped everything down really well and tried to minimise running time in this situation. after drilling I centred the piece on the original centre, supported it with the dead centre again, and turned the bar down to 0.25" using the right hand tool. I ground up a left hand tool and took this diameter all the way up to the 1/16" thick crank disc. I swapped back to the right hand tool and turned the majority of the shaft to 1/8", changed to the left hand tool and finished the shaft off. I changed to the parting tool and parted it off to length. Almost done! I filed off the little spigot left from the parting tool, and centred the crankshaft in the chuck. I faced the crank disc to remove the part the dead centre rested in. I used some wet and dry sandpaper (moist) on the end to finish it. There we have it, one complete crankshaft! The amount of brass shavings I made today was phenomenal...
Here are the parts so far:

Just the frame left to fabricate now - this will require some thought
and probably major modifications to make it with my equipment (ie, the
lathe and hand tools). With a drill press it would be pretty
straightforward. I'm currently thinking that my frame will look
radically different to Dave's. The jury's out as to whether thats a
good thing or a bad thing ;)
Stay tuned!
Back to the index
Taper Turning 101
Its been a while between updates, I've been a bit busy with a new job
and all but I have still been playing around with my lathe. Brassy Babe
has gone on the backburner for a while, as I'm having trouble figuring
out how to make the frame using my equipment - it may have to wait
until I'm set up for drilling on the cross slide. I have collected a
few sewing machine motors, but I'm yet to buy the pulley and find a
belt to complete the motor upgrade. This may wait until after Christmas
as my probable belt supplier will be pretty busy until after then. I've
been playing some more with turning CD motor rotors, and made one from
aluminium into which the original (slightly distorted and off centre)
can was pressed. This worked ok for a little while, but the magnets
themselves were damaged, so my next rotor turning experiment will
probably involve Neodymium magnets and a strip of steel glued to the
inside of a thin aluminium can. This will probably thread onto a
standard GWS shaft (M3*0.5). To play around with threading I bought an
M3*0.5 taper tap, plus a die and drill bit (2.5mm) to match. I threaded
a couple of holes by hand and decided I would make a tailstock die
holder similar to that described in LH Sparey's book. So I had to
figure out how to turn a taper to match the tailstock's Morse 0 taper.
I played around a bit and came up with the technique described below.
I selected an old printer shaft I had laying around in the shed and hacked off a section about 1.3" long. I turned about 0.92" of this down to approx .305" diameter, and then turned a series of steps, 1/8" apart and reducing in diameter by 0.007" each time. The diagram below shows this, in case my descriptions didn't help you:
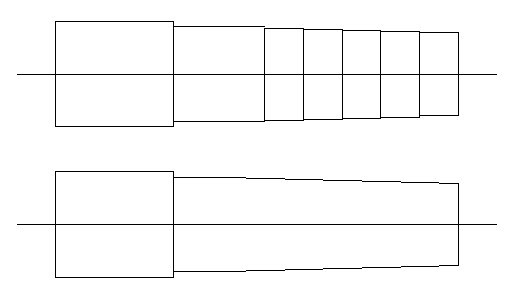
The second step was to hold a file to this as the work rotates. Be patient with this, it will take a while but the result (in my case) was perfect. On my next one of these I intend to take the steps even finer to minimise filing required.
Happy with the taper I'd produced I moved onto the next part - the holder itself. I then realised that I'd made the shaft *much* too short, so rather than make a new one I ended up drilling a 1/8" hole into the taper, turning a 1/8" spigot onto the end of an extra length of shaft, and press fitting them together by fitting the taper to the tailstock and using the handwheel to screw it onto the extra shaft. I do NOT recommend this method as it was a major pain and it would have been quicker to make a new taper. The resultant shaft is also much weaker. I took a few cuts along the length to make sure everything was true and put this aside. I must say, I quite enjoy working with this steel as it machines cleanly, easily, and by setting the tool to "rub" I've found I can achieve an *excellent* finish. Below is a diagram of the final dimensions of my shaft. The maximum diameter is not critical, as long as your die holder barrel hole matches it.

I've started turning the barrel, but more on that next time...
Back to the index
Next job was to drill the holes. To assist with marking out I coated the front face and the outside with nail polish. I marked a centreline on the face, and used a square to continue this back along the barrel. I then marked the depths for the holding screw holes and the tommy bar holes. This went into my vice, the hole marks were centre punched, and drilled with a big hand drill (I do not have a drill press). I then hand tapped the two holding screw holes. After cleaning off the nail polish, it was done! After digging up some M3 screws it was testing time :)
I turned down a brass bolt to 3mm diameter, fixed my M3*0.5 die into the holder, plugged the shaft into the tailstock and slid the holder onto the shaft. I found starting the thread pretty difficult (a chamfer on the end of the item to be threaded will probably help this a lot) but once it was started it was simple to thread the whole shaft. With the tommy bar (I use a .16" steel rod from a floppy drive) in a hole and the chuck key in one of the screws, I rotated the chuck towards me and the holder away from me. This process was repeated and the thread completed. Apart from starting the thread this process seems pretty simple and straightforward. I need to do some more experimenting though.
Below are pictures of the parts and the complete attachment, along with the first item I threaded with it.


This was a pretty easy accessory to make and looks like it will be very useful in the future. Now, I made mine to fit 25mm die, but I'm thinking about boring the other end to suit the 1" die size. This will enable me to simply swap which end I use. This part of the attachment enough is simple enough that a CAD diagram shouldn't be needed, but if theres enough demand I'll draw up the whole thing and post it on here.
Now to decide what to build next.... any suggestions?
Back to the index
Home
E-mail me if you have any questions or comments!
I take no responsibility for any damage caused to people, animals, or property by following the procedures I've described on this page. I'm by no means an expert so I'm just describing what I've done, not the perfect way to do them!
Copyright 2003, Tristan Williams
It is a work in progress so stay tuned!
Contents
Early
Days
|
25/11/2003 30/11/2003 1/12/2003 1/12/2003 2/12/2003 3/12/2003 17/12/2003 18/12/2003 |
In the beginning!
I caught the machining bug while reading threads on the E-Zone about making new rotor cans for CD-ROM brushless motor conversions. I then read up about machining and steam engines in particular. I looked around, did a lot of research, and decided I wanted to buy the Clisby lathe. It is a tiny metal lathe manufactured here in my home town of Adelaide, South Australia. My reasoning for wanting this lathe was that it is low cost, compact, yet big enough for my requirements. If I decided I didn't like the hobby I wouldn't have needlessly spent a huge amount of money.Purchasing
The first thing I did was order in a book from Plough Book Sales - "The Amateur's Lathe" by L H Sparey. While it mainly deals with the larger 7.5" lathes, many of the techniques and concepts scale well to the Clisby lathe. I recommend it to any other beginners out there.
I then checked out a few tool stores in my area and found that I could buy everything I needed within 5-10 min drive of my place. On the big day I first visited my local tool store and bought:
- Dial caliper
- Dial test indicator
- Sewing machine oil
- Cutting fluid (brand name is "Tap magic")
- 3 3" long pieces of 3/16" high speed steel tool bit stock
- Clisby long bed metal lathe
- Large tailstock chuck
- 1/8" centre drill

Mounting
After thoroughly reading the manual several times I set about mounting it. A quick rummage through my shed discovered a nice 1/2" thick piece of laminex coated wood. I pulled out the jigsaw, made it look a bit neater, and sanded the edges. I marked out for the mounting holes and drilled these. I countersunk them on the underside. Finding that I had no suitable bolts for mounting I drove to the hardware store and bought these. While I was there I also purchased some safety glasses (VERY important! Don't try machining without a decent pair) and some nice looking brass bolts to practice on.
Mounting was a reasonably simple affair. I used cardboard as packing under the feet, and put the bolts through from the underneath. These needed to be shortened, and I had to remove the motor to be able to tighten them. The pair at the headstock end were tightened all the way, and the pair at the tailstock end were left finger tight. This is to prevent distortion of the bed.
First snag
I then noticed that the saddle leadscrew would not rotate! No matter what I did, I could not get it to turn. I thought about this for a while, and eventually undid the screw holding the handle to the bed (on the inside of the tailstock end of the bed) and removed the leadscrew totally. I held the section thats meant to be stationary in my vice and applied a large force to the handle - I heard a sharp cracking sound and the leadscrew started to rotate. After finding out more about how these lathes are constructed I'm now pretty sure that during assembly some of the loctite used to hold the handles together managed to get into the gap between the handle and the stationary part. Anyway, I oiled it liberally and worked it back and forth for a few minutes, clearing the gunk that came out of the gap. Its still a little stiff but it works great - its only a pain if I'm winding the saddle from one end of the bed to the other. I reassembled it all and decided it was time to give it a shot!
First cuts
I used an F-clamp to hold it to the bench a little more firmly and dug out my power supply. I'm using an old PC power supply I pulled out of a 486. I found the +12V and ground wires, hooked it up to the lathe and plugged it into the wall. I put some oil in the oiler hole and oiled the leadscrews. On went the power, and I flicked the switch while holding my breath. It ran! With a big grin on my face I decided it was time to take some test cuts. I grabbed one of the brass bolts and put it in the chuck. I spun the chuck a few times by hand checking to see how true it was running and to my amazement it was pretty much perfect. I got lucky - its not normally this easy with a 4-jaw chuck! I donned my safety glasses and positioned the tool to take a very shallow first cut on the head of the bolt. I flicked on the power and slowly advanced the saddle towards the chuck. My first cut barely skimmed it and took off very little metal. I wound it back again and wound the cross slide further in. This time I took off a little bit more metal. Chips of brass went flying. I was making chips! I proceeded to turn the head of the bolt down to half its original diameter and then faced it too.
There we have it! I'd taken my first tentative steps into the all new realm of hobby machining. Stay tuned for more!
Back to the index
Centring work, basic techniques and cutting steel
Centring workRotor cans for brushless outrunners (eg CD ROM motors) require steel outsides to reduce losses. This meant I had to machine steel with my little lathe. I found some galvanised tube at the scrapyard of a suitable inner and outer diameter to be a starting point. I hacked off a section and chucked this in my lathe. A few minutes with the dial indicator had it centred. Below is a photo of my setup for doing this. I use a "helping hands" device to hold the back of the dial test indicator, positioned in such a way that the end is perpendicular to the surface of the work, under tension. This means that when I rotate the chuck (by hand! Do not switch on with the indicator in place!) I can see the needle move either to the left or right showing deflection. I can then adjust the jaws to shift the work in the required direction to centre it. Once satisfied with the placement I tighten the jaws (do not over-tighten them - you can damage the jaws) and check the centring once more. I then put the indicator away to avoid damaging it while turning.
Note - due to the large diamater of this workpiece I gripped it using the ouside of the jaws on the inner diameter of the pipe rather than the inside of the jaws on the outside of the work. Otherwise the jaws need to be reversed and the saddle cannot be traversed all the way under the chuck as the jaws will strike it (I found this out the hard way).
 |
 |
Facing and steel turning tools
Now that the work is set up, it is time to set up the tool. I found that the easiest method to machine steel on this lathe is to use an *extremely* sharp bit. Grind it until it is as sharp as you can get it. Put it back in the toolpost with only the minimum amount out the front as possible - this reduces possible flex and stresses on the machine to a minimum. I start by setting the tool at a 45 degree angle for facing the work. As I use a right hand bit (for cutting towards the chuck) I face from the centre out. I have tried it both ways and I find this easier. Move the tool bit to the centre (in the case of my pipe I move it to just past the inner diameter), switch on, and take a very light cut outwards. Wind back to the start of the cut, advance the saddle a few thou and take another light cut. With steel it helps to put some cutting fluid on the work and tool bit. Take it slowly, be patient, and you'll be rewarded with a nice finish. Continue this way until the entire surface has been machined flat. The surface has now been faced!
Turning an outer diameter
Time to machine the outer diameter of the pipe. Start by setting the tool just beyond the end and just outside the outer diameter. Switch on, and advance the tool slowly towards the chuck. It should barely skim the work. Return to the end, and advance the cross slide by 2 or 3 thou. This is very important with steel as taking deeper cuts than this will most probably stall the motor. Again traverse the work slowly, and hopefully you will take off more material. Continue this process until the work has been trued - this means that the entirety of the outside has been machined. You can then continue turning the diameter down until you have reached your target diameter. You will find that keeping the workpiece and tool bit lubricated with cutting fluid will make the process easier and the cuts cleaner. Make sure to regularly oil the headstock and clear chips from the ways. This is very important as steel chips will damage the ways if left there. Taking these precautions should hopefully result in a long life of your machine.
Turning an inner diameter
With the outside diameter turned it is now time to turn the inside diameter! This requires a boring tool. These are tricky to grind, but the pictures available at this site should help (thanks Mark!). I do this just like the outer diameter but starting from the inside and working towards myself. Take shallower cuts, and sometimes it pays to repeat cuts on the same setting - this accounts for spring in the tool. Work your way out until the inner diameter has reached its target.
Thats all for tonight folks, check back later for more news.
Back to the index
First steps towards a Brassy Babe!
When I was researching steam engines, I fell in love with one in particular - Brassy Babe, a single acting wobbler designed by Dave Goodfellow. The plans are available here. Due to limitations of the equipment I have I will be making a few modifications, including making it a 2-piece frame. I will also find some way to eliminate the need for milling the piston. Today I finally found a source for brass and aluminium round, and bought some 1 1/4" brass round. I hacked off a piece and put it in my lathe. To do this I reversed the jaws and used the inner set of grips. After centring it I faced it and then set about making a depression - purely for the sake of looks. This was achieved by starting a cut about 3mm out from the centre of the face and ending it about 4-5 mm in from the outside. I returned the tool to near the start and wound it a bit deeper. First I backed it up to the edge of the first cut (you can hear the lathe start struggling when you've reached it) and then I wound it to the edge of the second cut (again, the lathe starts to struggle at this point). I kept doing this until I was satisfied with the depth. If you set your tool at a 45 degree angle like I did then you'll end up with a nice taper between the high and low levels.Drilling
This is the method I used to drill the 1/8" centre hole. I'm not sure if this is the best way to do it or not, but it turned out farbetter than my previous experiments with drilling did.
I removed the chuck from the lathe and wiped down a clean, flat spot for me to set it down. I located the centre of the wheel and centre punched it lightly (so as not to put much strain on the chuck). I then put the chuck back on the lathe, mounted the Jacobs chuck in the tailstock, and put the centre drill in the chuck. I pushed the tailstock up close to the work and locked it in place. On went the power and I gently rotated the tailstock handwheel - advancing the poppet and drill. The centre drill immediately found the point I had centre punched and drilled into it. After allowing the taper of the drill to enlarge the hole a little I swapped the drill to a 1/16" bit. This requires you to go slowly and patiently. I lubricated the drill bit with cutting fluid which seemed to smooth things a long a bit. Every now and again I retracted the bit and cleared the brass chips from the bit, lubricated it again, and kept drilling. When it got to the point where the poppet was extended quite a long way I retracted it, shifted the tailstock closer to the chuck (so that the bit started inside the workpiece) and continued drilling. Eventually I was rewarded with the sound of the motor unloading as I broke through the other side. I replaced the drill with a 3/32" bit and drilled through again. I repeated this until I had drilled through with a 1/8" bit.
Finishing
I faced the front lightly again to remove the lip that the drilling had left behind. To finish this side off I held a file to the outer edge to bevel it slightly, and then held sandpaper to the wheel where it had been machined. I then reversed the paper and used the non-abrasive side to polish it slightly. While it is still possible to see tool marks, it is quite shiny and feels extremely smooth. A good enough finish for my first project I thought, so I moved on. I loosened two jaws ever so slightly, flipped the wheel around and tightened the jaws again. A quick facing cut and some filing and sanding had the job completed!
Heres what I ended up with:

I'm quite proud of how well this part turned out, and barring unforseen difficulties this should make it into the final engine. Next up? The piston! Stay tuned for more, hopefully I will complete the piston tonight.
Back to the index
A Brassy piston!
Pistons pistons pistons! The plan calls for a 3/16" diameter brass piston, but I didn't feel like turning down a huge slice of the brass round I bought to something that small, so I dug out one of the brass bolts I had experimented with. Into the lathe it went, and I started turning the threads off when I noticed that I was getting some flex. This makes sense as the bolt was long and thin.Turning a long thin shaft
I rechucked it with the head of the bolt only just beyond the chuck jaws and faced off the socket for the screwdriver. I then centre drilled it, and gripped the very end of the bolt in the jaws, with the dead centre in the centre hole I'd made. I locked the tailstock and wound the poppet forwards until it was a firm fit and then locked the poppet. I switched the lathe on and noticed it was running a lot slower than usual - a drop of oil on the dead centre fixed this. I proceeded to turn it down until the threads were gone and measured it - 0.175"! Too thin for a 3/16" piston. I quickly took stock of my selection of drill bits (quite a few missing, I need to buy a new set) and found that the next smallest bit I had was 1/8". I thought about this and decided I might as well try to modify the design for a 1/8" bore. I don't know how well it will work but I can always build a new one if it doesn't run - it will be a good exercise in machining.
Anyway, I finished the rod by holding sandpaper to it and then a rag. It is reasonably smooth now.
Parting off to length
My nice 1/8" shaft turned out to be 2" long and I only wanted a 1.6" length. I didn't want to hacksaw it off, so I ground up a parting tool and used that! At the point it has a width of about 1.5mm and it tapers in slightly at the sides and front to give clearance. I set it up so the tool just poked out of the toolpost, and the point to be cut was barely clear of the chuck jaws. I very very slowly advanced the bit into the workpiece at the point to be cut, using cutting fluid. Moving slowly this took a nice square cut out of the piston. The remaining material got thinner and thinner until only a thin spigot was left, which then broke and the leftover dropped gently to the cross slide. It left a nice flat face on the cut piece, with a small bump that was easy to file off.
Drilling the crank pin hole
Unfortunately I didn't take any pictures of this stage, as it may be hard to explain. First of all I marked the rod where the crank pin hole had to be. I laid the rod flat across the face of the chuck (jaws loosened quite a way) so that it was approximately centred. I then tightened two jaws on one side of the rod so that they formed a horizontal platform to rest the rod against. I tightened the other two up so they nearly gripped the rod, but still allowed me to shift it. Dead centre went into the tailstock, and this was brought up to the workpiece and the tailstock locked so that I could see where the centre of the work was. I adjusted the rod's position and the jaws until the dead centre was in line with where the crank pin hole needed to be, tightened the jaws up, and replaced the dead centre with the centre drill. On went the lathe, and I started the hole with the centre drill. I then used a 1/16" bit to finish the hole all the way through.
Finishing
The plans call for one or both side/s of the piston to be milled flat to allow clearance for the crank disc, however I do not have any milling capabilities just yet. To do this I put the piston lightly in my vice so that it was reasonably square and filed it flat. I haven't filed it much yet, as I need to draw up the engine in CAD first to determine exactly how much filing I need to do.
Heres the finished product with the flywheel and a rule to give some scale:

It looks tiny next to the flywheel,
and with the reduced power from the smaller piston I'll be surprised if
it can spin such a heavy flywheel, but then again I've never built one
of these things before so I'm just going to try it and see what
happens! If it doesn't work it'll be a good learning experience.
Whats next you ask? Either the cylinder block or the crankshaft. It depends what pieces of scrap I have lying around to use. I may even cut a round of aluminium, face it, make a couple of parallel cuts on it, face those, and then face the ends to make an aluminium cylinder block. I will probably adapt the screw size to suit ones I have pulled out of old toys etc.
Whats next you ask? Either the cylinder block or the crankshaft. It depends what pieces of scrap I have lying around to use. I may even cut a round of aluminium, face it, make a couple of parallel cuts on it, face those, and then face the ends to make an aluminium cylinder block. I will probably adapt the screw size to suit ones I have pulled out of old toys etc.
Back to the index
Cylindrical
goodness
After consulting Dave about the suitability of my 1/8" piston, I used
Autocad to draw up a new cylinder based on the materials I had
available. I have plenty of 1/4" aluminium plate so I decided to use
that. I ended up with a piece 1" * 1/4" * 5/16". I hacked this chunk
off and filed it roughly to shape, and then carefully filed the
appropriate side perfectly flat. I marked out and centre punched the
bore, and located it in my chuck. This was quite difficult to grip
well, but I ended up with the end of a jaw on each of the four sides.
Centre drilled the punch mark, and then drilled it, slowly increasing
the bit size until I had drilled it 1/8". To get the correct depth I
wrapped a piece of masking tape around the bit where I needed to stop.
Then I tried inserting the piston into the bore and found it wouldn't
go in very far! I'd machined the piston *slightly* oversize, so this
didn't come as a surprise. Crude lapping
To overcome this I put the piston in the Jacobs chuck, coated it with cutting fluid, turned the lathe on and advanced it into the bore. I was soon able to put it all the way in. I then unlocked the tailstock and slid the piston in and out of the bore with the lathe on, simulating the motion of the piston in action. After stopping the lathe I found that I could easily move the piston in the cylinder and that there was little to no side to side play in the motion. I guess this was a primitive lapping technique - to truly lap it I would've used an abrasive compound.
Final steps
Once I was satisfied with the fit of the piston in the cylinder I marked out the pivot and air holes and centre punched them. I then set it up in the chuck similarly to how I set up the piston, centre drilled and then drilled through with a 1/16" bit. I made sure to only go halfway through by regularly stopping and looking down the bore to see if I'd broken through. I was quite pleased with the depth of the bore and positioning of the air hole, as the bit cut a depression in the bottom of the bore - just as planned. I was able to wash the swarf out of the holes by pouring water into the 1/16" holes.
Heres a group photo of the parts so far:

Out of interest I just loaded the piston into the cylinder, sealed my lips around the end and blew into the air hole - the piston shot out of the end. I'm pretty happy with the fit of these two parts at the moment!
Next job? Probably the frame. The end is in sight! Only another 2 parts to make. I've probably spent about 9 hours so far on this engine, but most of that has been thinking about techniques. I could probably build another one in half that time or less, especially if I had some better drill bits. I might have to splash out for a nice set...
This is great fun :)
Back to the index
Crankin!
I decided to make the crankshaft today. I didn't have any 5/8" stock, so I took my 1 1/4" bar, took a 0.7" slice off it, and then took chunks off the sidea of that slice until I had a roughly 0.7" square * 1 1/4" bar. The ends were curved, so I filed one of them to be mostly flat so that the chuck would hold it better. I also flattened the areas to be gripped. I put this in the chuck, roughly centred, and started turning it down. I had to proceed very very slowly otherwise the work would slip in the chuck. To fix this, I centre drilled the end and supported it with the dead centre. This enabled me to take cuts 10 thou deep, so I took a lot of material off very quickly. Once the outside (as much as protruded from the jaws) was trued, I turned it around in the chuck and trued the part that had previously been gripped by the jaws. Mmm, a home-made 0.65" round bar. Now it was time to turn this into a crankshaft!First up I faced the end of the bar and turned it down to a diameter of 0.55". Note I was still supporting the work with the dead centre, so I couldn't machine the entire face. Next I started to work on the 0.25" diameter - to do this I started removing material along the whole bar excepting the 1/16" at the very end. I went to a depth of about 0.35" with the right hand tool, meaning I had a taper down to it from the end (due to the clearance angle on the bit). I decided that it would be best to drill the crank pin hole before I'd removed too much material, so I offset the piece in the chuck so that a point on the correct diameter was at the centre of rotation. I then centre drilled this and ran it through with a 1/16" bit. During this time there was a lot of vibration due to imbalance in the chuck - I just clamped everything down really well and tried to minimise running time in this situation. after drilling I centred the piece on the original centre, supported it with the dead centre again, and turned the bar down to 0.25" using the right hand tool. I ground up a left hand tool and took this diameter all the way up to the 1/16" thick crank disc. I swapped back to the right hand tool and turned the majority of the shaft to 1/8", changed to the left hand tool and finished the shaft off. I changed to the parting tool and parted it off to length. Almost done! I filed off the little spigot left from the parting tool, and centred the crankshaft in the chuck. I faced the crank disc to remove the part the dead centre rested in. I used some wet and dry sandpaper (moist) on the end to finish it. There we have it, one complete crankshaft! The amount of brass shavings I made today was phenomenal...
Here are the parts so far:

Stay tuned!
Back to the index
Taper Turning 101
Its been a while between updates, I've been a bit busy with a new job
and all but I have still been playing around with my lathe. Brassy Babe
has gone on the backburner for a while, as I'm having trouble figuring
out how to make the frame using my equipment - it may have to wait
until I'm set up for drilling on the cross slide. I have collected a
few sewing machine motors, but I'm yet to buy the pulley and find a
belt to complete the motor upgrade. This may wait until after Christmas
as my probable belt supplier will be pretty busy until after then. I've
been playing some more with turning CD motor rotors, and made one from
aluminium into which the original (slightly distorted and off centre)
can was pressed. This worked ok for a little while, but the magnets
themselves were damaged, so my next rotor turning experiment will
probably involve Neodymium magnets and a strip of steel glued to the
inside of a thin aluminium can. This will probably thread onto a
standard GWS shaft (M3*0.5). To play around with threading I bought an
M3*0.5 taper tap, plus a die and drill bit (2.5mm) to match. I threaded
a couple of holes by hand and decided I would make a tailstock die
holder similar to that described in LH Sparey's book. So I had to
figure out how to turn a taper to match the tailstock's Morse 0 taper.
I played around a bit and came up with the technique described below.I selected an old printer shaft I had laying around in the shed and hacked off a section about 1.3" long. I turned about 0.92" of this down to approx .305" diameter, and then turned a series of steps, 1/8" apart and reducing in diameter by 0.007" each time. The diagram below shows this, in case my descriptions didn't help you:

The second step was to hold a file to this as the work rotates. Be patient with this, it will take a while but the result (in my case) was perfect. On my next one of these I intend to take the steps even finer to minimise filing required.
Happy with the taper I'd produced I moved onto the next part - the holder itself. I then realised that I'd made the shaft *much* too short, so rather than make a new one I ended up drilling a 1/8" hole into the taper, turning a 1/8" spigot onto the end of an extra length of shaft, and press fitting them together by fitting the taper to the tailstock and using the handwheel to screw it onto the extra shaft. I do NOT recommend this method as it was a major pain and it would have been quicker to make a new taper. The resultant shaft is also much weaker. I took a few cuts along the length to make sure everything was true and put this aside. I must say, I quite enjoy working with this steel as it machines cleanly, easily, and by setting the tool to "rub" I've found I can achieve an *excellent* finish. Below is a diagram of the final dimensions of my shaft. The maximum diameter is not critical, as long as your die holder barrel hole matches it.

I've started turning the barrel, but more on that next time...
Back to the index
First Accessory Complete
Right, onto the barrel! It started out as a chunk of 1 1/4" aluminium, about 1 3/4" long, faced on both ends. I roughly centred it (by eye), and bored the inner diameter for the die (in this case a 25mm diameter metric die). To do this I did facing style cuts to a smaller diameter until I was down to the depth I desired, then normal cuts along the ID until the die slipped in nicely without play. Next task was the hole through the centre for the shaft to slip into. I drilled through with every bit I had up to the one just smaller than 1/4" (the capacity of the large chuck) and then ground a long boring tool. This was hard work, but I finished up with a tool capable of moving through a hole of that size, almost 2" deep. This was bolted into the toolpost and I started enlarging the centre hole. This was slow going due to the spring of the tool, so each cut had to be taken several times to "work out" the spring. When the diameter got close I started checking it regularly by trying to fit the shaft into the hole. Eventually everything was a good slip fit, so I trued the outside diameter of the barrel to some distance back (in case I decide to do more work on it later this will provide a good reference point for the indicator) and removed it from the chuck.Next job was to drill the holes. To assist with marking out I coated the front face and the outside with nail polish. I marked a centreline on the face, and used a square to continue this back along the barrel. I then marked the depths for the holding screw holes and the tommy bar holes. This went into my vice, the hole marks were centre punched, and drilled with a big hand drill (I do not have a drill press). I then hand tapped the two holding screw holes. After cleaning off the nail polish, it was done! After digging up some M3 screws it was testing time :)
I turned down a brass bolt to 3mm diameter, fixed my M3*0.5 die into the holder, plugged the shaft into the tailstock and slid the holder onto the shaft. I found starting the thread pretty difficult (a chamfer on the end of the item to be threaded will probably help this a lot) but once it was started it was simple to thread the whole shaft. With the tommy bar (I use a .16" steel rod from a floppy drive) in a hole and the chuck key in one of the screws, I rotated the chuck towards me and the holder away from me. This process was repeated and the thread completed. Apart from starting the thread this process seems pretty simple and straightforward. I need to do some more experimenting though.
Below are pictures of the parts and the complete attachment, along with the first item I threaded with it.


This was a pretty easy accessory to make and looks like it will be very useful in the future. Now, I made mine to fit 25mm die, but I'm thinking about boring the other end to suit the 1" die size. This will enable me to simply swap which end I use. This part of the attachment enough is simple enough that a CAD diagram shouldn't be needed, but if theres enough demand I'll draw up the whole thing and post it on here.
Now to decide what to build next.... any suggestions?
Home
E-mail me if you have any questions or comments!
I take no responsibility for any damage caused to people, animals, or property by following the procedures I've described on this page. I'm by no means an expert so I'm just describing what I've done, not the perfect way to do them!
Copyright 2003, Tristan Williams