First of all:
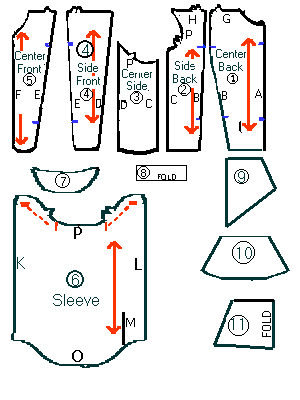
The pattern I have written these directions for is for patterns similar to the one on the left. (At this time the pieces are in approximate proportion to eachother) Be warned that the scale of pieces in this image is approximate at current time. I need to make accurate dimensional measurments, then I will correct it to scale. 
I am working on getting my pattern(s) here, but it may take awhile, since I believe I will need to put them on a graph-type format, somehow.
Black colored words will have definitions added
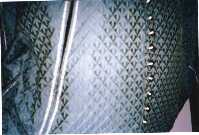
Finished Doublet Photo
Materials:
3 to 3 ½ yards of fabric for outside of doublet- Suggestions: Home Deco fabrics, upholstery fabrics "I will refer to this as FABRIC"
Measurements:
It's generally a good idea to take full measurements before making any new garment. For this garment, we took the following Measurements .
We then compared the measurements to the pattern and made adjustments as necessary, initially adding at the marked adjustment lines.
If you enlarge this pattern so that each square (Hmm..the graph isn't showing up)equals 1", the finished doublet measurements will be linked here.
Pattern Layout
If you are familiar with pattern layout, you may not need to read this next section, but it never hurts to read it anyway.
Have your FABRIC folded with the grain, so that the selvage is matched against itself. If your FABRIC has a printed pattern, decide which way you want the print to go on your doublet & be sure you lay your pattern pieces accordingly.
When you lie the pattern pieces on the fabric, Start with the Center Back (#1), and align edge "A" parallel with pattern of FABRIC. A trick I use keep the FABRIC patterns matching up is to align the other pieces in numerical order and align the angles of seam edges to the angle of the prior piece. This is especially useful if the FABRIC isn't wide enough to lay out all the pieces side by side.
Cut LINING in the same manner, being careful to keep the pieces lying the same direction on the FABRIC & LINING, and not to cut pieces with the grain/print going the wrong way.
Pieces:
I strongly recommend surging or zigzag stitching at least all edges of pieces 1 - 6, as these will experience the most stress and are most susceptible to fraying. If the FABRIC or LINING seems like it will have a tendency to fray, I surge all edges of all pieces.
Assembly
When pinning pieces together, make sure you keep all Right Sides of your fabric and "tops" of pieces pinned & sewn correctly.
Begin by assembling FABRIC pieces.
A) Pin Right Sides of Center Back (No. 1) pieces together at Seam A, marking 5 ½" from the top & 6" from the bottom. Sew only the top 5 ½" and the bottom 6", so that the center "slash" is unsewn.
B) Pin Right Sides of Side Back (No. 2) to Seam B of Center Back (No. 1) pieces, marking 5 ½" from the top & 6" from the bottom. Sew only the top 5 ½" and the bottom 6", so that the "slash" is unsewn.
C) Pin Right Sides of Side Back (No. 2) to Seam C of Side Front (No. 3) pieces. Sew entire seam.
D) Pin Right Sides of Side Front (No. 3) to Seam D of Side Front (No. 4) pieces. Sew entire seam.
E) Pin Right Sides of Side Back (No. 4) to Seam E of Side Front (No. 5) pieces, marking 5 ½" from the top & 6" from the bottom. Sew only the top 5 ½" and the bottom 6", so that the "slash" is unsewn.
F) Pin Seam GH & IJ Right Sides together on each side of doublet, matching seams first at neckline, and leaving any unevenness at the armhole side of the seam. Sew the shoulder seam from neckline to shoulder.
**Now, follow Steps A - E and assemble LINING. You now have a FABRIC body & a LINING body.
Once you have completed Steps A-E for both the FABRIC and LINING, iron each seam & slash. (Hint: If you iron the slash "seams" a bit wider than the sewn seams, the slashes open more and are showier in the finished garment.)
G) Pin Right Sides of one sleeve (No. 6) FABRIC & one sleeve LINING together. Sew the two side seams only, do not sew the top or bottom edge! Make sure you have marked the cuff slits as indicated on the pattern. Sew along the "v" of Seam K through both LINING & FABRIC. Cut from bottom of sleeve to 1/2" from seam, as indicated by the dotted line on pattern. Repeat with other sleeve FABRIC & LINING. Turn right side out & press.
H) Pin the right sides of two Shoulder Bills (No. 7) together and sew along the curve. Clip 1/3" cuts along the seam edge of the curve, being careful to avoid clipping past the stitch line. Repeat with other pair of Shoulder Bill's. Turn and Press.
I) Fold each Cuff(No. 8) lengthwise, Right Sides together. Sew each short side, turn & press.
J) Pin Right Sides of each FABRIC Peplam(No. 9, 10 & 11) to each corresponding LINING piece. Sew sides and bottom edges of each Peplam. Clip small 1/3" cuts from the seam edge toward the seam along the bottom curve of each piece, being careful to not cut past the stitch line. Turn and Press.
Adding the Sleeves & Shoulders to the FABRIC body
**Note: If you want to add trim or embroidery, you will want to add it to the Sleeves or Shoulder Bills before attaching to Body.
K) Pin one Shoulder Bill to the Right Side of the FABRIC Body on top of each Armhole. Sew each Shoulder Bill to top of armhole on FABRIC Body.
L) Pin Right Side of each sleeve into the armhole, so that Right Side of Sleeve and Right Side of Body are together. Match the "dots" at the top of each side of the sleeve to eachother & pin to armhole. (Note: The sleeve "Slash" should be pinned about 2" forward of the shoulder seam in the armhole.) Gather or pleat the extra Sleeve fabric as necessary. Sew Sleeve to FABRIC only.
M) Pin Cuff (No. 8) to Right Side of bottom of each sleeve, pinning so that edge of cuff and slit in sleeve are aligned. Gather sleeve bottom along dotted line & sew only one side of cuff to FABRIC sleeve. Hand sew cuff to LINING.
Sewing the LINING to the FABRIC
N) Pin Right Side of FABRIC & LINING bodies together at Seam A (left side) along the neckline to Seam F (right side). Sew along Seam's F & Neckline. Do not stitch slashes, bottom of coat or armholes!. Turn Right Side out & Press.
O) Pin the FABRIC slashes to the corresponding LINING slashes, and topstitch the FABRIC to the LINING at the slashes.
**Note: If you want to add trim or embroidery, you will want to add it to the FABRIC body before before adding the peplams.
Now, handsew the lining to the armhole, and handsew along the slashes where needed.
Hopefully, at this point, you should have a mostly finished looking doublet. Only need to add the peplams (No. 9-11) & then do the finishing work. (like buttonholes, lace or other trims)
Adding PEPLAMS
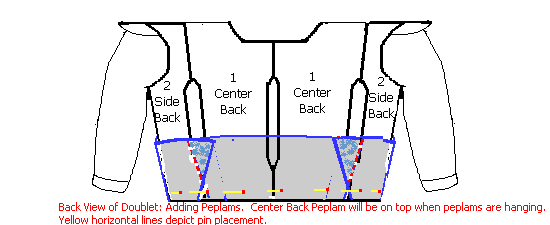
P) Ideally, you should have the "costume customer" wear the doublet at this point, and hand pin the front closure shut. Attach all Peplams in place through the FABRIC with pins until you are happy with placement. The Front points will hang the lowest. After you have the placement ok, you will be repinning all the peplams RightSide to the Rightside of the FABRIC, so that the are pinned to the bottom seam. (see Picture)
Make sure the Side Peplams (No. 10) are pinned so that (when hanging) its edges are overlapped on both sides by the Front & Back Peplams.
Now, that your peplams are pinned in place, sew them to the FABRIC only. Move the LINING out of the way as you sew the peplams on. (Don't just sew them through both FABRIC & LINING as, you will have a very difficult having the doublet be finished at the bottom edges..)
Pin the LINING and FABRIC bottom seam closed and Handsew the bottom edge of the LINING to the bottom of the FABRIC. Machine sewing this is not recommended.
BUTTONHOLES
Now all that remains, is adding in the buttonholes. If you are using 3/4" buttons, make your buttonholes 1 1/2" apart. For a 14" front length, this translates to 11 or 12 buttons. If you are using a different size button, adjust your spacing accordingly, but keep the distance between your buttons, relatively close.
(And, since I've done this myself, make sure you use the right size buttonhole :> )
Historically, the more buttons, yardage, & trims you used on your garment, the more well-to-do you were. It was not unheard of to have buttons down all the slashes & sleeve lengths.
That's it for my directions! Hope they help you out.
Please feel free to email me if you have questions or comments. :~)
Back to Costuming Page

Closeup of embroidered trim
Special photo of finished Doublets.
3 to 3 ½ yards of lining. I use cotton/poly in a complimentary color to the FABRIC. (I generally stay away from taffeta or other fragile linings.) "I will refer to this as LINING"
Trim - approximately 10 yards to line every seam - Optional.
Buttons - 14, if just buttoning down the front & at cuffs.
Add approx. 24 more buttons if you wish to have buttons down the length of the sleeve slash.
(This also will be added relatively soon)
(insert "grain.gif" here).
1) Center Back (2 FABRIC) & (2 LINING)- Center seam "A" should be straight with Grain.
2) Side Back (2 FABRIC) & (2 LINING)
3) Side Front (2 FABRIC) & (2 LINING)- Seam "C" should be straight with grain
4) Mid Front (2 FABRIC) & (2 LINING)
5) Center Front (2 FABRIC) & (2 LINING)- Seam "F" Should be straight with Grain.
6) Sleeve (2 FABRIC) & (2 LINING)
7) Shoulder Bill (4 FABRIC) & (2 Interfacing - optional)
8) Cuff (2 FABRIC) & (2 LINING) & (2 Interfacing - optional)
9) Front Peplam(2 FABRIC) & (2 LINING)
10) Side Peplam(2 FABRIC) & (2 LINING)
11) Back Peplam(1 FABRIC) & (1 LINING)


(Hint: if you desire the shoulder bill to be stiffer, add interfacing before sewing the Shoulder Bills together.)
Note: All trims to the body of the doublet were added

tiger_meep@yahoo.com
Back to Main Page
people have looked here since I put the counter in on February 22, 1999.