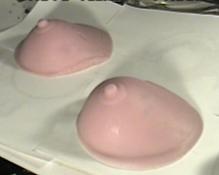
Also notice the discoloring of the paper on which they were sitting. A relatively small amount of softener was used in these yet they still ooze a little.

 Lilith Papillon - Breast Forms, Plastic


This article details the procedure for creating a breast form from
the same material used to make wiggly fishing lures. In many ways
this is superior to the latex model described in another article.
Get all your material within reach. Once the process has begun you can't leave leave the plastic unattended while you run off to get something you forgot.
Read the instructions regarding the proper handling of your plastic. Even though most plastics are treated the same there are likely to be some differences. Heating temperatures may vary between manufacturers for example.
Judge the amount of liquid plastic you'll need. Use the measuring cup to transfer the liquid from the jug to the heating pan. I've found that three cups is more enough for a single form (1 side, not a pair.) However, my forms have been relatively large (but not obscenely so) so maybe 2-1/2 cups for a moderate form. You'll have to eyeball it at first. Don't expect to use the measuring cup for cooking purposes. Reserve it for this process.
Afix the thermometer to the side of the pan, immersing the sensing tip into the liquid plastic.
Wait until you've put the pan on the stove before turning on the heat. You want to start heating slowly. Though you'll eventually be bringing it to a fairly high temperature you need to advance the temperature slowly to avoid scorching. Start out with low heat and watch the temperature. Begin stirring immediately, keeping the liquid moving and working the bottom and the sides of the pan. When the temperature doesn't seem to be advancing any, turn up the heat a little. The temperature shouldn't need to go much past medium. Just get there slowly.
The plastic I obtained requires a temperature of 325 degrees, though I've seen instructions for another brand that only required 315 degrees. If it looks like the temperature is going to exceed your limits, remove the pan from the heat immediately. Check the instructions for your brand of plastic to determine how you know its ready. For me the plastic initally turns a straw color while heating then turns clear. It should turn a syrupy consistancy. I tend to let it cook a bit longer.
When the plastic is ready it's time to add your coloring. Keep the temperature up while adding your color. If you're going for a pinkish color, add a bit of white pigment. The pigment comes in small bottles and is dispensed by the drop. For three cups of plastic I use about ten drops of white. Stir the plastic until the color is distributed evenly. Add a drop of red and mix it in. Add the red coloring a drop at a time, always mixing it in evenly before adding another drop. Don't dump in large quantities. You'll want to judge the intensity of the pink color carefully. It shouldn't take much red to reach a pink color.
When the plastic has gotten up to temperature it becomes necessary to keep the temperature close to the desired level, even when stirring in the coloring. If it starts to get over the recommended temperature be prepared to remove it from the heat.
Now that the coloring has been distributed evenly it's time to pour it into the mold. Be sure the mold is stable and even. Pour the plastic into the mold slowly so that the heat from the plastic can disperse evenly. Pouring too quickly can cause the plaster to expand faster than the surrounding mold resulting in cracking. If the pan doesn't have a pouring spout you might want to hold a spoon against the outside lip of the pan to help direct the plastic down into the mold.
When the pouring is finished it will take some time for it to cool. I've taken to letting a fan blow across the mold to help it cool more quickly. Don't go by the temperature of the exposed plastic. Wait until the plaster is cool also. Removing the form should be simple unless the plastic wasn't "cooked" sufficiently. If this is the case the plastic will be more gelatinous and will stick to the side of the mold. The consistency will not be good for our purposes. If the plastic is firm enough you shouldn't have to worry too much about using whatever pressure is necessary to remove it from the mold. Slip your fingers between the plastic and the mold near the top and work your fingers deeper under the plastic. Work around the edges towards the bottom. It should come out fairly easily. Walla!!
|
Here are several forms of varying degrees of success. This set was
made from a two boob mold. Notice the roughness of the inside edge
where they were cut apart. The nipples are fairly unrealistic but
mash down well enough not to show when worn. The lower edges have
a nice taper but the top edge is rather blunt. Ideally the outer,
top, and bottom edges would taper thin enough to flow into the body.
Also notice the discoloring of the paper on which they were sitting. A relatively small amount of softener was used in these yet they still ooze a little. | 
| |

|
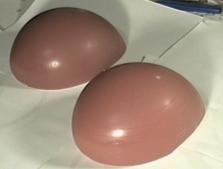
A bit of trouble here with color control. The discoloration may
have been caused by a number of factors including rapid heating
or the shelf-life of the plastic fluid.
These are two different sizes using the same mold by filling it to different levels. I also tried using a ladle to transfer the plastic from the pan to the mold on one of these. Though you might not be able to see it in this picture there are definite indications of layering due to the plastic cooling between transfers. | |
| Two more discolored ones. These I might use to develop the concept of demi-forms (see below.) They're fine for use where nothing at all shows. | 
|
In order to prevent the heat distribution problem I've been on the lookout for other materials for making molds. One substance that looks promising is RTV (Room Temperature Vulcanization.) This is a rubber type of material, usually made by combining the rubber with a catalyst. It sets at room temperature and should be resistant to the heat inherent in the liquid plastic. I figure that it should be used to create a thin mold and then itself embedded in plaster to to give it some rigidity. The RTV should insulate the plaster from the greatest part of the heat. At the very least, if the plaster cracks it won't affect the mold itself and should continue to provide some rigidity.
There is available an additive to the plastic that acts as a softener. Though the breast form isn't awfully rigid it still doesn't have the feel of a the real thing. I've tried adding softener to loosen it up. This works but has a side effect. The softener tends to bleed out and can stain whatever it comes in contact with. Ideally I'd like to find some sort of film that can be used to coat the form to prevent the seepage.
Another additive that I've seen mentioned but as yet have been unable to find is a foaming agent for the plastic. I feel that the plastic, like latex, would be less rigid if it were foamed.
I'd also like to work on a two piece mold concept to form a depression in the back of the form. In essence this would result in a form that is more like a shell. It should reduce the rigidity to some degree without using softener. Of course all of these methods have tradeoffs and are not necessarily workable in combination.
I'm also considering what you might call demi-forms. I see these as being about a 3/4 size form for fitting inside a bra or bustier and using ones own fleshiness, via taping, to provide the cleavage for that strapless look. To make this I may have to take an existing pair of forms and cut them at opposing biases, possibly creating a curved depression in each to provide a smooth transition between the real and the unreal. From these I'd make individual molds. If my mind is picturing this right the mold will probably have a large undercut. But the flexibility of the liquid plastic ought to allow extraction without too much trouble.