Layers: Creating a Semi-transparent Tile
Layers are probably the best new feature of PSP 5. Think of layers as
sheets of transparent film on which you can paint image objects.
You can paint different objects on different layers, and you can add new
layers, delete layers, or rearrange the order of your layers.
Your final image will be a composite of all the layers. (Well, of all
the visible layers, but we won't worry about that until the
tutorial on creating animation component files.)
In this tutorial, we'll make a semi-transparent background tile using
layers:

- First, open the image that contains the opaque version of
your tile. (See Creating
Backgrounds for instructions on creating a background tile.)
- Hit Ctrl+A to select the entire image, then hit Ctrl+C to
copy the selection to the clipboard. You can then close this file.
- Next, open a new 16-million color file with a white or light-colored background
(I chose a pale yellow). Give this file the same dimensions as your opaque tile.
- Click the Layer Palette toggle on the PSP toolbar (or choose
View | Toolbars | Layers Palette) to show the Layers Palette.

You'll see that your image contains a single layer called "Background".
"Background" is special in that it is always completely opaque
and its opacity cannot be adjusted with the Layer palette controls.
- Hit Ctrl+L to paste the previously copied selection in as a new layer.
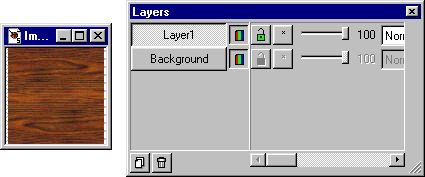
Notice that the Layers palette now shows two layers: "Background" and "Layer1".

"Layer1", the new pasted-in layer, is above the background layer.
Since "Layer1" is completely opaque, you can no longer see the
background layer underneath.
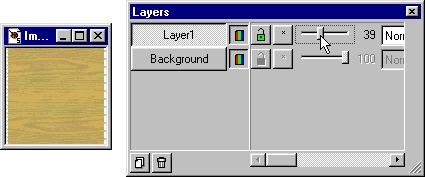
- Go to the Layers palette and drag the Opacity slider for "Layer1"
to the left. Watch how the opacity of your tile image changes, with the color
from "Background" showing through.

- When you have the opacity at the level you like, you can save the file.
If you think you'll want to experiment with this layered file again,
first save using the PSP format. (Layers are saved to disk only
in the PSP format.) Then for your tile, save as either a GIF or a JPEG.
This tutorial introduced only some of the most basic aspects of layers.
Check out the later layers tutorials for discussion of more advanced features,
such as Blend Modes.
Back
Copyright ©2000 Lamander
All rights reserved
|


