 |
FIRST AID INSTRUCTIONS IN EMERGENCIES |  |
 |
FIRST AID INSTRUCTIONS IN EMERGENCIES |  |
| I hope you will never have to render first aid to someone in danger but if such a need arises, you had better not be a mere witness of his death. Firstly, we will see how we can save someone who has stopped breathing or whose heart has stopped beating or both. It is also important to understand that someone who is breathing and whose heart is beating but has lost consciousness must be placed in the position of recovery so that he may not be endangered. |
| The text and the
sketches below are taken from the book "First Aid Manual" of the
British Red Cross published by Litsas Medical
Publications. K. Litsas, MD, was editor of the Greek edition. |
![]()
![]()
| Cardiopulmonary Resuscitation (Recovery) |
| If the victim is not breathing and his
heart has stopped, it is vital that artificial
respiration be performed in an effort to restore
circulation, so that blood flow and oxygen supply to the
brain remain constant. Remember that: First, you must
make sure that Airways are open. Second, you must support
Blood Circulation with compressions (external compression
of the chest.) and Third, you must secure the victims
breathing by blowing air into his lungs in order to
oxygenate the blood. Prompt and effective application of artificial respiration combined with external compression of the chest if needed, will prevent further deterioration of the victims condition and will maintain life, until expert aid can be provided.Cardiopulmonary resuscitation must always be attempted even if there are doubts as to whether or not the victim can be brought to life. There must be continuous effort until breathing and pulse are restored, the victim is taken care of by expert staff or by a doctor, or until the person who renders first aid becomes exhausted. |
| Control of breathing |
| To find out whether the victim is breathing, get your ear close to his mouth and observe his chest and abdomen. If the victim is breathing, you will hear and feel the respiration and you will see his chest and abdomen moving. When breathing has stopped, it is almost certain that the victim has lost consciousness; but it is not always easy to find out exactly when breathing stops. |
| Opening the airways When the victim has lost consciousness, the airways may be tight or closed, making breathing difficult or impossible. This happens for various reasons. The head may have a forward tilt thus narrowing the passage of air; there may be no control of the throat muscles which has resulted in a backward drop of the tongue and finally, secretions and vomiting due to reduced reflexes -may have gathered at the back of the pharynx blocking the passage of air. When the airways are open, the victim may start breathing spontaneously. If he doesnt, put him in the recovery position. If again he doesnt breathe, you must begin artificial respiration.
|
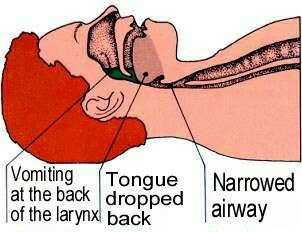 |
| Place one palm under the victims neck
and the other palm on his forehead and tilt his head
backwards. This will cause stretching of the head and
neck and opening of the airways. |
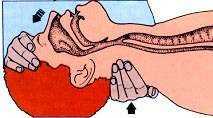 |
Move your palm from the neck and lift the chin upwards. In this way, the jaw is moved and the tongue is lifted thus ceasing to block the airways. |  |
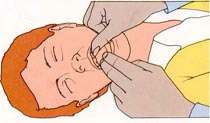 |
Cleaning the
airways. While the victim is still in the above position, every foreign body must be removed if possible e.g. vomiting, dentures, or food particles; anything that can be seen or felt. To do so, turn the victims head to one side, put the index and the middle finger together, bend them and sweep the interior of the mouth. You should NEVER waste time looking for possible foreign bodies hidden in the airways. |
| Artificial respiration The most effective way to secure the victims breathing is to blow air from your lungs to his by blowing into his mouth (Mouth to Mouth artificial respiration.) Sometimes, however, this is impossible and another method of artificial respiration must be used.
|
|
The air we breathe
contains approximately 16% oxygen, which is a quantity
greater than what is needed to maintain life. During
Mouth-to-Mouth artificial respiration you blow air from
your lungs into the victims mouth or nose (or, in
children, simultaneously into mouth and nose) to fill his
lungs. Every time you remove your mouth, the victim
exhales, as the elastic cage of the chest goes back to
its original position. Mouth-to-Mouth breathing allows
the observation of possible movements of the chest, which
will show that the victims lungs are filled with air or
that the victim is breathing again on his own, as well as
the observation of any color changes. |
 |
| *The only cases when Mouth-to-Mouth respiration
must not be applied are some cases of poisoning, when
there is poison in the area around the victims mouth that
can affect the person performing first aid. Moreover,
performing it may not be possible when the victim bears
serious facial injuries, vomits often, or is lying on his
stomach and cannot be rolled over. |
|
| Method: Remove any visible
obstacle from the face and relax anything that can
tighten the victims neck. Open the airways and remove all
the foreign bodies visible in the mouth or in the victims
throat. Open your mouth well, take a deep breath, pinch
the patients nostrils closed and apply your lips around
his open mouth. (For Mouth to Nose artificial respiration
close the victims mouth with your thumb and apply your
lips around his nostrils.) |
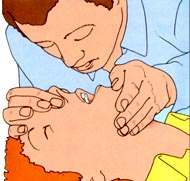 |
| Observe the chest going down and take
a deep breath and repeat ventilating. Give the first four
breaths as promptly as possible without waiting for the
chest to fully go down in the intervals. Check the victims pulse to make sure that his heart is beating. If the heart is beating normally keep blowing in at a normal breathing rate. (16- 18 times a minute) until the victims natural breathing is restored while at the same time supporting it when necessary and adjusting your frequency to the frequency of his breathing. When the victim starts breathing at a normal rate place him in the recovery position. If the victims heart is not beating, you must immediately start external compression of the chest. |
 |
| Supporting the victims
circulation Continuing to perform artificial respiration is pointless if the victims heart is not beating because the oxygenated blood cannot circulate. After the first four breaths you must carefully look for cardiac pulse. You must always remember that while sometimes it is acceptable to support a weak breathing, cardiac beating is easily destabilized, so if the heart is beating, however weakly, you must not attempt external compression of the chest. . |
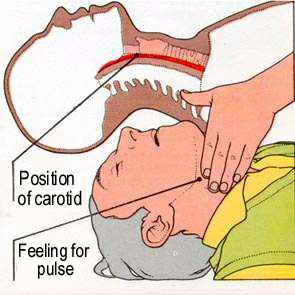 |
 |
External compression of the chest When the heart is not beating, you can simulate the heartbeats by compressing the chest. Compressing the area under the sternum to the left increases the pectoral pressure resulting in promoting the blood from the heart to the arteries. Relieving the pressure results in the chest repositioning and the blood flowing from the veins, refilling the cardiac cavities as they expand. Artificial respiration always precedes external compression of the chest and always accompanies |
| Method: |
||
| Lay the victim flat on his back on a hard surface. Kneel beside him, facing his chest, on heart level. Find the bottom margin of the rib cage, down near the abdomen. Using the hand closer to the victim's feet, follow the edge of the ribs as your fingers move up toward the centre of the chest. You will feel a notch where the ribs meet the breastbone. Put your middle finger on this spot and then put your index finger next to your middle finger. | Now place the heel of your other hand next to the index finger. Place your other hand on top of the first. You can either interlace your fingers or keep them straight, but at no time should they rest on the chest. To avoid injuring the ribs, only the heel of your hand should touch the chest. | Keep your shoulders directly over your hands and your elbows locked. Move your body forward until your arms are vertical over the victims body. Depress the chest (4-5 cm for adults). Then come up stopping the pressure. Bear down and come up 15 times, at a rate of 80 per minute (to find the right rhythm count out loud as you do the compressions, "1 and 2 and 3 and 4 and 5!" etc) |
 |
 |
 |
| After you open the airways with the
head - tilt / chin lift movement ventilate twice using
the Mouth to Mouth method. Continue with 15 compressions
and 2 full ventilations and check whether the heart has
resumed beating after the first minute. Recheck every 3
minutes or after 12 cycles of compressions alternated
with breathing. As soon as the heart starts beating, stop
compressions and continue with artificial respiration
until the normal breathing is restored, supporting it if
necessary and adjusting your rhythm to the victims. Place the victim on the RECOVERY POSITION. |
 |
Checking for responsiveness. When cardiopulmonary resuscitation is successfully performed, carotid pulse will reappear. The colour of the face and lips will improve, as oxygenated blood will start circulating. When the victim is not breathing his colour turns to blue (cyanosis). |
| CARDIOPULMONARY RESUSCITATION performed by two |
| When two people render first aid, one will be responsible for maintaining open airways, performing Mouth to Mouth artificial respiration and checking for heartbeats. The other will perform the external chest compressions. If cardiopulmonary resuscitation is prolonged the individuals can trade places to reduce weariness. Moreover, performance is easier when they are positioned on either side of the victim. |
| One individual kneels at the victims head and the other on his side on chest level. The first person open the airways immediately, gives the first four breaths and then checks for heartbeat. If the heart is not beating, the second person performs five chest compressions. | Cardiopulmonary resuscitation continues as follows: The first person opens the airways and ventilates only once and the second performs 5 chest compressions. This goes on at a rate of 60 compressions per minute, until the heart resumes beating. To keep the proper rhythm, count out loud 1001, 1002 etc. Checking for heartbeat must be done after the first minute and then every three minutes or every 12 full cycles. | Attention: The person performing artificial respiration breathes in at the stage of relaxing every fifth compression so that external chest compression is not interrupted. |
 |
||
| RECOVERY
POSITION Victims that have lost consciousness but are breathing and whose heart is beating are positioned in the recovery position. This position secures that the airways will remain open, that the tongue will not drop back against the pharynx, that the head and neck will remain stretched keeping the airways widened and making sure that vomiting or other secretions in the victims mouth will freely flow out. The position of lower limbs secures stability necessary for keeping the body in a safe and comfortable position. The technique described can be modified depending on the injuries and the victims condition to prevent further injury. Recovery position may not be ideal, at first, if the victim is to be examined. It is not ideal either when he suffers spinal injuries. However, it should be promptly used, if breathing becomes difficult or noisy and cannot be restored by opening the airways or if the victim will remain unsupervised. The sequence of actions in order to roll a person over, as described here, does not need to be applied in full when the victim is already lying on his side or on his stomach. If he is wearing glasses, they should be removed, to prevent eye injury during rolling over |
| Kneel with the body upright, on the victims side and on a right angle in relation to him, at a distance of about 25 centimetres and on his chest level. Turn the victims head to your side and tilt it backwards and lifting the chin, as in opening the airways. | Place the victims arm closer to you, on his side, parallel to his body, with the palm under the buttock, facing up if possible. Bring the victims other arm over his chest. Holding the shin that is further to you by the knee or under the ankle, bring it to your side and cross it over the other. | Protect and support the victims head with one arm and with the other take strong hold of his clothes at the hip that is closer to you and quickly pull the body toward your side and prop it against your knees, rolled on the side. |
 |
 |
 |
| While you are still supporting the victims body against your knees, correct the position of the head again so that airways are kept open. Bend the victims arm that is on top and position it so that it can support the torso. | Bend the knee that is on top and pull it forward so that it can support the lower part of the body. | Carefully take the victims other arm from under the body, beginning at the shoulder and leave it parallel to the body, so that it prevents the victim from rolling back again. |
 |
 |
 |
| If the victim is heavy you might need to use both your hands to roll him over. In this case, take strong hold of his clothes at the shoulders and hips and pull him to your side so that he can lean on your thighs. If there are other people present, someone might support the head while you turn the body, or pull at the hip with both hands while you are rolling the body over or he can pull at the hip with both hands while you are pulling at the shoulders with one arm and holding the head with the other. Someone may be needed to kneel opposite you and push the victim as you pull. |  |
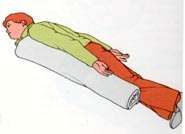 |
The above mentioned technique must not be used when the victim has suffered fractures, when there are restrictions of space, or it is not possible to bend the limbs to use as props. In these cases, recovery position can be maintained if a rolled blanket is placed on the ground parallel to the victims body. This method can also be used for the victims transportation on a stretcher in recovery position. |
| HOME |