How We Cook That Pig
How we cook that pig depends an awful lot on how we build that pit, so that's what this section of our page is going to concentrate on. And along the way you'll most likely be able to pick up on how the pig actually cooks. It's atmosphere mostly, stepping out of this place and time to a place and time where life moves at an easier pace, and friends gather with excitement to help you savor the moment. Sorry folks, but cell phones and laptops don't work here. You're better off bringing pork rinds and potato chips.
And don't forget to have fun with it. When I found out Alice was coming in from somewhere in south Georgia, I told David and Tracy to be sure to give her a tour of our fair city before they brought her home. They looked at me like I was crazy, but when they got her home they told me they thought she was a local pig because none of the scenery seemed to impress her, and because she "never even batted an eye" as they passed Young Brother's.

The perfect pig is right at two hundred fifty pounds; the meat is sweeter and more tender--and if you're butchering it yourself, much more worth the time it takes to dress it. Our pigs average 125 pounds, dressed. Fall is the traditional time of year for hog killing (at least it was when I was growing up). We'd spend the spring and summer months fattening them up, then around about the middle of October we'd take the little ones to market and the bigger ones to the slaughter house. Prices will vary according to the season and the year, but you can probably expect to pay anywhere from $1.35-1.40 per pound for one from a wholesale meat supplier.

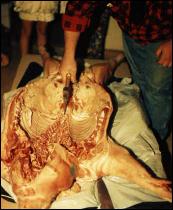
When our pig comes home she's already split and cleaned, not to mention dead. We like to take a look inside though, just to make sure all the innards have been removed. Sometimes little pieces of stuff get left behind, and they need to be gotten rid of. When that's done, we use an axe to split the backbone so she'll lay flat. I'm kind of funny about hair, so I usually check her for that and use a razor to touch her up if she needs it.

We don't have a cooler big enough to hold a pig, so we stuff her insides with a couple bags of ice and wrap her in big garbage bags to keep her chilled. And of course it helps if we don't pick her up from the meat supplier any sooner than we have to, and keep her out of the sun and in a cool place.
She goes on the fire at midnight, and cooks for twelve hours at a moderate temperature, until about noon the next day. Just before midnight we get her ready for cooking by sandwiching her between two standard chain link fence gates fastended together with baling wire. We give it handles by wiring metal rods to each side of one of the gates. The gates then lay across the width of the pit, and since the pit is a little wider than the gates are tall, these extensions also serve to support the pig over the fire.
The gates work really well for a lot of reasons. They easily support the weight of the pig and allow for even distribution of heat and smoke; it's easy to baste the whole pig through the chain link, easy to turn it, and, should the meat want to fall off the bone, it's not going to fall into the fire. Clean up is easy too--just throw them into the pickup and haul them to the car wash.

Okay. So it's not very pretty. That's largely due to the fact that we store the cinderblock and grate inside the pit and keep it covered with the tin roof for much of the year. It gets a hosing down when we reopen it and get it set back up, but that doesn't help it look any better.
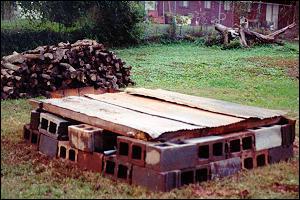
After marking the ground, removing the sod and digging a hole, I used a square edged shovel to cut straight sides. I then laid cinderblock two courses high around the lip of the pit. Four blocks from the upper course--two each from the long sides--are removed to accomodate the gate handles, which leaves the gate resting on the bottom course of block, and the roof on the upper course. It's an oven, is what it is, with a heat source at the bottom, the oven "door" on top, and the pig resting inbetween. The pig never actually goes into the ground.
Eventually we hope to line the entire pit, building it up with cinderblock, and maybe giving it a nice brick facing. Yeah, I know. It's kind of permanent. But we figure we're here to stay, and so are the annual pickins.

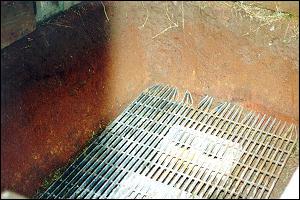
Turning some of the cinderblock on their sides allows air to circulate inside the pit and feed the fire. Too much circulation will cause the fire to burn too hot--too little circulation, and it won't burn hot enough. And you don't really want a fire anyway, just a nice hot bed of coals.

The fire is built on top of a heavy metal grate set up off the ground on cinderblock to allow for better circulation. We use a whole bag of charcoal set in a stack of firewood and doused with kerosene to build the original fire. Once that fire burns down, we use wood coals from a seperate fire built in a split barrel to keep the pit at an even temperature. In the top of the picture to the left, you can see the opening we use to feed coals into the pit.
We take every precaution to avoid the fire getting out of hand--beginning with a fire permit obtained before the event begins. And we always keep a waterhose and a fire extinguisher at the ready. P.S. If you're going to use kerosene, then use kerosene.--NEVER USE GASOLINE TO START A FIRE! Using gasoline to start a fire of any kind is dangerous and just plain stupid. The fumes can ignite in an explosion of flame!

When we got to Corrine (the 3rd pickin') we decided we needed a new roof for the pit. The roof's wooden frame doesn't burn or catch fire while it's over the hot pit, but it does rot pretty quick laying on the ground all year long.
To build the roof, we measured the pit, cut two-by-fours to fit, and braced the frame with two-bys at each corner. We then nailed down standard metal sheet roofing--overlapping it a little--and trimmed it close to avoid getting cut by the sharp edges. We used foot-long one-bys nailed into each corner of the frame for handles. Without them, lifting the roof off the pit is a chore!
While building the new roof for Corrine, our local creative genius and Pitmaster, Tracy Duckett, came up with a positively brilliant idea. He loosely screwed one-bys into the frame of the roof so it could be propped up in place. Check out the great results in the picture below.


Thanks to J. B. Tate we lost a lot of the woods in our backyard during the Spring of '97. David and I had been hacking away at them since we moved in, but I won't let him have a real (gas powered) chainsaw--just one of those little electric ones--so it's been taking us forever to get our lot cleared. For some reason J.B. took an interest in our interest to fell the clutter of trees that had been left to grow up wild for the last thirty to forty years, with the result that we now have enough firewood for at least the next five or six pickin's--if it doesn't rot first.
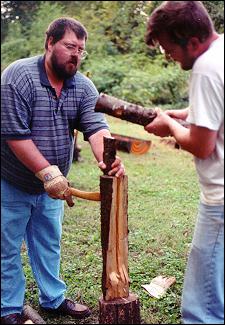
We use just about a half cord of wood for each pickin, that's about as much wood as you see stacked in the picture of the pit at the top of this page. We also use a wheelbarrow full of split-wood to smoke the pig. After splitting the wood into pieces the size of your forearm, we soaked it in water for twenty-four hours (easy to do in the rain), then threw it into the pit on top of the hot coals. It's not anything you have to do, it's just one of those extras that makes it special. We used hickory with Alice, which was okay, but I like the flavor of fruitwood better. Beatrice was smoked with apple, and Corrine with cherry.
The Parker Pig Pickin Page
http://geocities.datacellar.net/BourbonStreet/3586
Cartersville, Georgia
![]()