Caryll Designs' FreeBees
![]()
A Simple and Fun Fiber Felting Test
This very simple and easy Fiber Felting Test is a great way to sample different fibers' ability to felt. It also makes wonderful little buttons that will match your knit or woven garments using only left over scraps of yarn! Children will enjoy this activity too and can make felt beads to string together or felt balls and shapes to decorate with sequins, beads, ribbons, or anything that can be sewn or glued to the surface. As an added bonus their hands will be really clean! Only natural protein fibers will felt such as wool, mohair, alpaca, llama, etc. This test makes it easy to identify felting fibers from any yarns that have no labels or whose composition is unknown. It works equally well with wooly fibers that have not been spun.
Take a short length of yarn or fiber, from 6 inches to a couple of feet in length depending on the weight of the fiber and the desired ball's size (small balls are easier to handle). Roll the yarn between the palms of your hand to form a loose round clump of fiber. Add one small drop of any mild dish soap such as Dawn or Ivory. Wet the yarn with soap under warm running water. Knead and roll the sudsy ball of yarn between the palms of your hands. You will likely have more soap than you need so rinse it under warm running water periodically. Continue rolling and kneading your fiber ball until it begins to stick together and felt into a ball shape. It will likely take only five minutes or less. If the fibers do not want to stick together after just a few minutes you will know this fiber doesn't want to felt or it will require a very long washing and felting cycle to achieve a felted fabric.
To make matching buttons or beads for a particular project, measure the length of yarn used and make each felt ball using the same length of yarn. You can also weigh combed fibers or fleece in grams to achieve the same size. With a little practice you will find that you can make different shapes with your felt balls by flattening them or rolling them into cylindrical shapes. If you're like me, you'll wind up saving all of your wooly scraps just for making felt buttons and beads! I'll bet you never knew you had an endless supply of buttons close by ;-)
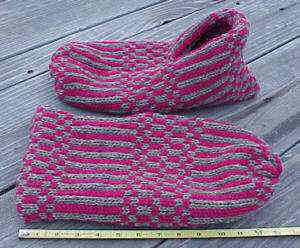
 Oversized Big Feet Before Felting. |
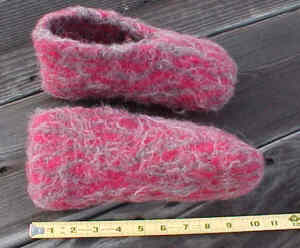
 Felted to Fit, different FairIsle pattern. |
This simple Felt Slipper Pattern created by ©Caryll Designs for your knitting and wearing pleasure can be knit by hand or on any brand of Knitting Machine. Personally I prefer to use a Sport or Worsted weight yarn, such as WoolPak Yarns NZ 8ply or any of Brown Sheep Company's Worsted Yarns, and knit a FairIsle pattern as this gives me a felt fabric that is twice the thickness of a Stockinet fabric and the floats felt in, but any pattern or knitting technique will work. Hand knitters might like to use a Bulky weight yarn and a Stockinet stitch. Play with it!!!
The key is the Felted Sample Swatch. Knit a small sample perhaps 30 stitches wide and 30 rows long. Choose a knitting needle or tension setting one or two sizes larger than normal for the yarn you are using. Wash the swatch in your washing machine on a Small or Medium size load setting in Hot Water Wash and Cold Water Rinse, Regular Cycle, with a squirt of mild soap such as Dawn or Ivory liquids. You will not be able to count the stitches once the fabric is felted so remember the size of your swatch! You will also need to wash your slippers for the SAME LENGTH OF TIME as your sample swatch because the time spent washing will determine the degree to which the fabric will felt and will affect the final size. It is best to wash and felt the fiber to it's maximum limit for these slippers in my opinion, which usually takes 2 ten minute wash cycles in my washing machine. This way you'll be guaranteed results without having to worry about over felting your slippers making them too small. The time it takes to felt will also vary with the fiber used, some fibers will require as many as 4 or 5 wash cycles. Try my Fiber Felting Test first to get a better idea how your fiber will felt. Measure your felted swatch. Divide the Felted Width into the number of Stitches Knit for the Felted Stitch per Inch Gauge. Divide the Felted Length into the number of Rows Knit for the Felted Rows per Inch Gauge.
Measure the Foot you want your slippers to fit. You will need the Foot's Length and the Foot's Width Circumference. Measure the Length by placing a tape measure on the floor and standing on it, measure from the back of the heel to the tip of the longest toe. ADD 1.5 inches Ease to this measurement. As an alternative means of measuring the Length (especially for children's feet), hold the tape at the center of the back of the heel, stretch it along the longest side of the foot (inside) and around the front of the big toe to about the middle third toe, use this Length without added ease. Use either of these Length Measurements multiplied by your Felted Rows per Inch Gauge to determine the number of rows you will need to knit for each slipper. Measure the Foot's Width Circumference around the thickest part of the foot, usually the upper portion of the Arch where it starts to bend into the ankle. ADD 1 inch Ease to this Width Circumference Measure. Use this Width Circumference Measurement times the Felted Stitches per Inch Gauge to determine the number of Stitches to knit for each slipper.
Now that you've determined the size and gauge, just knit them! I use Woolpak Yarns NZ 8ply for my slippers which I knit in FairIsle on my Bulky Knitting Machine at Tension 7. This same Sport weight yarn will likely knit well on US 7 knitting needles. Cast On the number of Stitches needed for Width using your favorite cast on method, leaving a tail of yarn at the beginning. This will be the slipper heel. Knit the number of rows for the Length desired. Cut your yarn leaving a 24" tail. Using a darning needle, draw the yarn tail through the remaining stitches on your needle from the opposite side, forming a circle, and remove your needle. This will be the slipper toe. Make another knit rectangle just like the first. To assemble, sew the oval hole of the drawn together toe stitches closed and laying flat side to side (not up and down in line with the side edges). Sew the seam where the two sides meet half way up the middle with a Mattress Stitch. Fold the Cast On edge in half and sew down the back of the seam on the inside of the slipper using the tail of yarn at the end. Work in your loose yarn ends. Wash it in Hot Water with a Cold rinse and a squirt of mild soap just like you washed your sample swatch. Voila, slippers! If you want them to mold to your feet put them on directly out of the Spin cycle while still damp and wear them for a little while, stretching and shaping to the desired fit. Air Dry.
Here is a Felted Slipper Diagram that will give you a construction visual that may help! Print it from your browser window or save it as a JPEG file.
Future Care: Machine Wash, Gentle Cycle, in Cool Water to prevent more shrinking, shape and Air Dry.
Production machine knitters can produce multiple pairs of slippers the same size by using waste yarn and ravel cord between each knitted slipper rectangle. Leave tails of yarn at both ends of the slippers. Use a Latch Tool to finish the cast on (heel) of each slipper after you remove it from the machine. Don't forget to pull that tail of yarn through the last row of Toe stitches before you remove the waste yarn!
Enjoy your toasty new toes!!!!
A curious thing I discovered while measuring feet for slippers. When you measure the Foot Length and Foot Width Circumference as described above, we have square feet! My size 10 Women's feet measure 10" long and 10" around the width before adding ease. So I knit my slippers 11.5" long and 11" wide with the added ease. My husband's size 10 Men's measured 11" long and 11" around the width so I knit his slippers 12.5" long and 12" wide with the added ease. I will bet that most feet will be very nearly square and that if you have a person's foot length you can easily determine the width by using the same measurement. Any small variations will adjust with wear and molding to the actual foot. I never would have guessed we have square feet!!!
©1999-2006, Caryll A. McConnell dba Caryll Designs. This pattern is yours to use and wear. Please do not reproduce it or sell the slippers without giving just a little credit to me. Mention my name and I'll be forever grateful! Thank you.
![]() One-of-a-Kind
One-of-a-Kind
![]() Hand-Dyed
Hand-Dyed ![]() Photo-Knits
Photo-Knits ![]() Hats
and Socks
Hats
and Socks
![]() Once-in-a-Lifetime
Once-in-a-Lifetime
![]() Weavings
Weavings ![]() Links
Links ![]() Caryll's
Home
Caryll's
Home ![]()
© 1999-2007, Caryll A. McConnell dba Caryll Designs, all rights reserved.