Spice's Spot Graphics Tutorials

Lesson 5 -
Plastic Text
This page will take a min of 45 seconds
to load
Throughout this tutorial - DO NOT DE-SELECT THE TEXT!!!
Using PSP.4.0 ( PSP 5.0 will need a different method)
1. Load PSP 4.0 and Go to
"File" in the top left hand corner of the screen
2. Click on "New Image"
3. Choose Width 260
Pixels
Height 80 Pixels
Resolution 72 - pixels per inch
Background White
16.7 million colours.
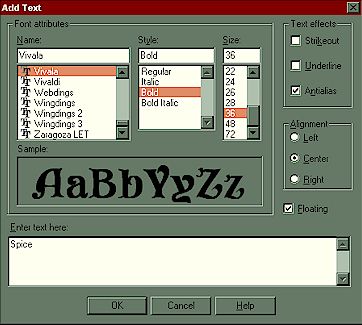
4. Enter Text you want- I chose Vivala -
keep colour at this stage as WHITE
Your PSP 4.0 text Screen should
be set as below as for Lesson 4,
BUT FLOATING should NOT be ticked.

Click O.K.
DO NOT DE-SELECT THE TEXT!!!
5.From Menu across top of
PSP4.0 Table choose Image
and from drop down menu choose "Special Effects" and "Cut
Out"
UNCHECK fill interior
Settings should be Shadow Colour:Black
Opacity: 255
Blur: 5
Vertical Offset: -1 (minus One)
Horizontal Offset: -1 (Minus One)
CLICK O.K.
Your image should now look like this

DO NOT DE-SELECT THE TEXT!!!
6. Go to Menu Bar of PSP4.0 and choose "Image" then Special Filters and Emboss

Your text should now look as
above.
DO NOT DE-SELECT THE TEXT!!!
7. Now choose from Menu Bar
COLORS/COLORIZE
Hue 161
Saturation 255
Click O.K.
DO NOT DE-SELECT THE TEXT!!!
8. Now choose from Menu
Bar, Image, Special Effects/ and finally ADD DROP Shadow.
Color Black
Opacity 180
Blur 10
Vertical 5
Horizontal 5
Select O.K.

Your finished image should look as above and you can now de-select your text.
9. Go
to "File" in PSP 4.0 Menu, and from drop down list choose "Save as"
and then
pick a folder on your hard drive and save the image as "Your
name.jpg"
Now experiment yourself, using the method above, up
to and including stage 6.
Then choose different settings for Hue and Saturation, so changing the
colour,
and finish with the same drop shadow settings. Choose a different
coloured
background, other than white, if you wish, but always keep text colour
as
white, changing the finished text colour with your own hue/saturation
settings.
MORE tutorials soon!!
Lesson 1 / Lesson 2 / Lesson 3 / Lesson 4 / Lesson 6
I would love it if my
Guestbook was signed
whilst you are here.(HINT!!)

![]()
About Spice - My Family - Index
Web Rings - Graphics
All page contents,
to include image files, backgrounds, photographs and text are the original artwork of
Spice's Spot
Any copying or reproducing these contents without written permission by Spice's
Spot is strictly prohibited.