|
Step 3. Capturing
images to top
Here we are ready
to vidcap. You should have your capture software open a little
before what you want to capture comes on so that you can modify
the color etc. for that specific channel.
When capturing
your images, you will have a visible captured image box that
will hold all your captures in memory until you delete or save
them. When capturing live, If possible it is a good idea to delete
the "bad captures" as you get them to make more room
for the ones you want to keep. This way you will be able to continue
to capture images faster as there are fewer in memory. Also commercials
or when the camera is not on the desired subject is a good time
to quickly shuffle through the images and delete ones that didn't
come out well or that you don't like.
If you are using
the sequenced files technique, you will not know how the images
are turning out until you save the file. But generally after
you delete the "bad" caps you will be left with far
more good captures than if you were just capping one frame at
a time.
When saving images,
it is a good idea to save them in a folder with the date and
name of the show, just in case you want to refer to it later
like when creating a montage.
Step 4. Edit
Preparation to top
Here is what
separates the good vidcappers and the not so good. Editing the
caps can make the biggest difference in the final presentation.
But editing properly is what is important. Knowledge of Photoshop
is what will make you a vidcap expert. I can't stand when people
take their caps, throw them together and post them somewhere
without taking the time to edit properly. You should expect to
spend at least half an hour editing the caps. Longer if you are
going to montage them.
Here are some
examples of what not to do...

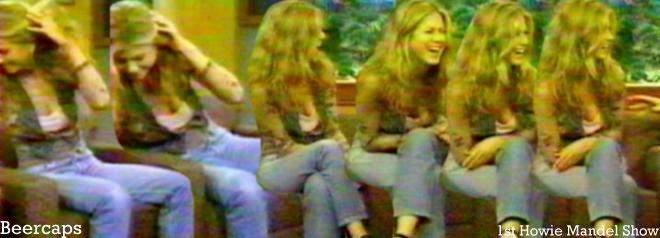
This is not a
vidcap montage, this is a piece of garbage compliments of Beercaps.
I hate to criticize other people's work but I mean come on! What
were you thinking? I must admit that Beercaps has certainly improved
since this monstrosity and he can only improve from here (which
he has.) Practice makes perfect and when you compare this to
some of his output now you can definitely see that this statement
holds true.
This is from
the same show, but done by a talented vidcapper by the name of
Riddler. 
Notice the HUGE
difference in quality, color, and seamlessness. Of course Riddler
has been doing this for years and that makes him much more experienced,
but his first images aren't even comparable to the work he puts
out now. So if you stick at it, you can vastly improve your skills
as shown here.
Before editing
the images, i prefer to resize them to 1024 * 768 pixels. I do
all my editing at this size so when scaled down to the final
size, the quality is much better than editing at the desired
size, here's what I mean.
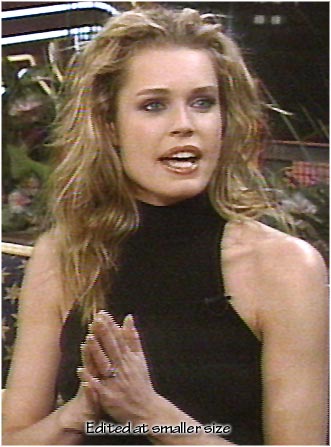
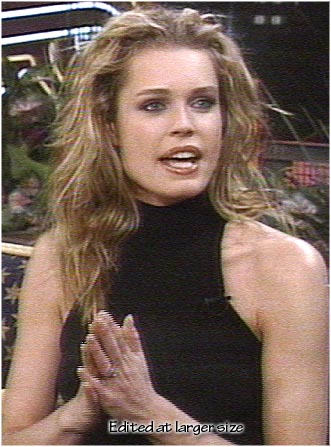
Below are two
images edited the exact same way. However the one on the left
was scaled down to the the final desired size and edited where
as the image on the right was scaled up to 1024 * 768, edited,
then scaled down to the final size.
 
Notice the image
edited at a smaller resolution loses sharpness, gets over sharpened
in bad places and is over saturated in comparison to the image
edited at a larger size. Although the image on the right looks
noisy, that won't show through when you size down the image for
a montage.
Tip:
Edit your caps at a high resolution like 1024 * 768
So how do you
edit your images? Well there's no set way to do it, but there
are some steps that everyone should use. Those would be color
correction, brightness contrast adjustments and sharpening. I
will explain each of these.
The greatest
new feature about Photoshop 5.0 (and 4.0) is its "action"
feature. Instead of editing your images one by one, you edit
one and record that as an action, then play that editing back
to all the other images. Actually my entire montage process is
a script that does all the work for me (except the initial editing
which I only need to do once.) I have a 150 step action set that
will take my raw caps, edit them, scale and resample, crop out
the edges, and put my border and logo on them. Believe me it
took a long time to make and get working properly.
ATI cappers take
note that your captures are taken at 26 dpi and need to be re-sampled
at 72 dpi so that text etc. are done properly.
Tip: record your editing
on one image then use Photoshop's batch processing to play the
editing back to all other images
from the set. Also you should make an action to resample your
caps to 72 dpi before editing.
1. The Photoshop
Layout
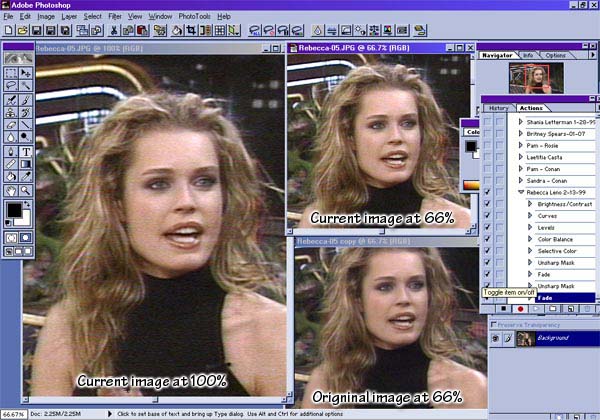
Before editing,
I like to make several copies of the image to see what I'm doing
at different sizes and to compare with the original. First I
duplicate the image and move that to the side so I constantly
have a side to side comparison of the original and current image
to make sure I'm not "over-editing." Then I use the
View | New View feature to make a new view of the image and zoom
out of it so that i can see what my work will look like at the
final image size. Here's what I mean:

My tip: Have
a side by side comparison of the original and new and a new view
to see what your work will look like at a smaller resolution |


