|
Before I start, i should mention
that all my editing is done in Adobe
Photoshop 5.02 and captured with the ATI
TV Tuner. Some of the information here will only be relevant
to ATI users and all editing will be strictly relating to Photoshop.
Step 1. System
Settings to top
Your computer should be configured
with at least 32 megs of ram, but think of upgrading to 64 megs
or more because graphic editing is heavily memory dependent.
Your memory should be adequately configured so that your cache
settings allow you to get the most out of your memory. I use
Cacheman (listed on my software page)
to tweak my settings.
You should also have plenty of
swap space available (at least 100 megs) and set a static swap
file size to about 120 megs or so in order to prevent needless
swap re-sizing. If you don't know how to do this then you shouldn't
be doing it.
Your capture card should also
have at least 4 megs of VRAM. This is ram dedicated to the video
card and is also where it will store the images temporarily unless
you're capturing directly to disk. The more ram you have, the
more captures you can take and the faster you can take them.
Tip:
Make sure you have a lot of ram!
You should defragment your hard
drive at least every 2 weeks to keep file access quick and prevent
lost sectors. I use Norton Speed Disk which is by far better
than the standard Windows Disk Defragmenter. Speed Disk allows
you to physically move files to where you want them on your hard
drive for faster access, move folders to the front and sort alphabetically
etc. Very powerful and useful.
Also keep in mind that Photoshop
requires 10 megs free space on C: at all times, without it you
will get a "not enough ram" error message and Photoshop
will fail to launch. That said lets get into the actual capturing.
Step 2. Video
Setup to top
To capture the
highest quality images, you have to have the best quality input
available. If your capture card supports S-Video then you should
use it! S-Video is much better than standard composite or coaxial
input. It separates the color information (Chrominance) from
the brightness (Luminance), which prevents nasty things like
color bleeding and dot crawl, and helps increase clarity and
sharpness. You can greatly improve the image quality by simply
converting to S-Video. For more information on S-Video see the
S-VIDEO
FAQ.
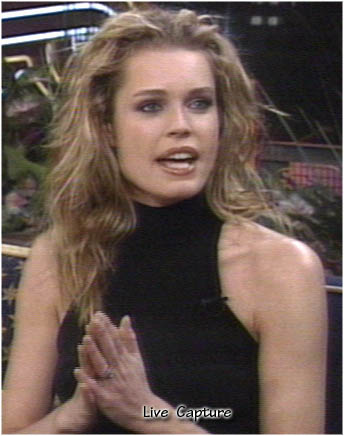
Also you should know that LIVE
captures are significantly better than tape playback (except
for tapes that you rent or buy.) Always try to capture live as
opposed to taping the program and capturing afterwards. You will
notice a great difference. Look at my example and notice the
difference in both color and sharpness.
 
As you can see there is
a difference in quality. These are raw caps (unedited) Also note
that I have a very high quality Toshiba
M782 VCR, $ 600 when I bought it and the quality still
doesn't match up to live captures. This only means that lower
quality VCRs will be even worse for playback.
Tip:
Always capture live!
Now that only applies for TV
shows of course, VHS tapes from the local video store will produce
much better quality than even Live captures. To
see a high quality capture from Starship Troopers click here.
One thing most people don't know
is the resolution capability of their capture card. Capture cards
are limited to 640 * 480 pixel captures, regardless of what other
people may tell you. This is because the input signal from the
TV is only that large. ( Just for your information, video games
on consoles such as playstation and N64 are only 320 * 240 resolution!
) I've argued with many people over this and they keep saying
how their card can save at 1024*768 and up, and what do I tell
them? You're right! That's because they are right. The cards
are capable of SAVING at just about any resolution you
want BUT, this is a resample image, that is the software
makes a capture at 640 * 480 and re sizes it to lets say 1024
* 768 by stretching it out.
Tip:
Don't let your video capture software resize the image for you!
Photoshop does a much job.
That's right, save your images
at the resolution you captured them in and then resize them to
whatever you desire in Photoshop. They will keep more sharpness
this way.
To capture at the highest possible
resolution check the "capture at 640 * 480 " and "do
not scale captured image".Your settings should look exactly
like this:

There are several different ways
to capture stills. You can use the single frame capture mode
whereby each still you grab will be presented in a preview window
until its saved. This method is what I've used for the past year
and was best for sorting out only the stills I wanted to keep.
Another method is using the sequenced still mode, whereby you
capture a sequence of frames directly to disk as one large avi
file. This is the method I now use because you can capture MUCH
more quickly. Then you can use a video editing program such as
Adobe Premiere (my personal favorite) to extract the frames.

For this use the middle button,
the one that looks like a video camera and paper. Before doing
this you must set up the proper size in the options (blue button
on the far right.) Go to the VCR tab and click the advanced button
and set it to YVU9 Planar (Indeo Raw) image format. This is the
best quality/size compromise and most widely accepted codec for
raw video. Then set the image dimensions to 640*480. This is
only available in 16 and 24 bit color depth. You will not see
them if you are in 32 bit color mode.

Now you have to set up the video
controls such as brightness, contrast etc. These settings will
vary from show to show and channel to channel. The main thing
to remember is to have the color set to its highest, and make
sure the tint accurately represents the picture on the TV (not
too yellow and not too red.)
Here are some general settings
that should be good for any channel:

Also note that the capture mode
is set to "Both Fields." This is the best option for
any kind of video because it will render the least "interlace."
ie. lines across the image. Set the Color Setting to "cool"
because when set to warm, the captures come out the same as set
to cool even through they look "warmer" in the video
window. I'm not sure if this is a bug in the drivers or not.
My
tip: set up your video settings before capturing ! Don't leave
everything up to the editing.
Now you should be all set to
capture.
|


