CORELDRAW
Projects and Tips
Intro to Digital Art, Lesson 1 - Bitmaps and Vectors
Intro to CorelDRAW, Lesson 1 - First Shapes
Intro to CorelDRAW, Lesson 2 - Polygons
Intro to CorelDRAW, Lesson 2A - Shaping Polygons
Intro to CorelDRAW, Lesson 3 - Freehand Tool
Intro to CorelDRAW, Lesson 4 - Interactive Tools

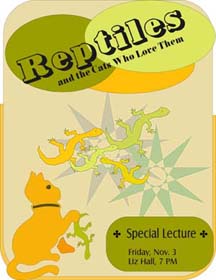
This is our first Coreldraw project. By class two of Intro to Coreldraw everybody should be well on his way to completing an image along these lines. We'll use it as a cover for the class manual.
The lizard was inspired by the book Teach Yourself CorelDRAW8 in 24 Hours by David Karlins. To view this book online, go to www.mcp.com and register for your own personal bookshelf. You'll find lots of other online books there, too.
Skills used:
- Rectangles with rounded corners
- With the Shape Tool, click on your rectangle. Drag any corner node. All the corners will turn round.
- Ellipses
- To draw a perfect circle, hold down the Control key while dragging. Switch to the Shape tool and drag the node at the top of the ellipse. Depending on whether you drag inside or outside your ellipse, you will be creating either a wedge (a closed shape) or an arc (an open one.)
- Polygons
- You can change the number of points on your polygon after you create it. Dragging one node changes all the nodes. Use the Shape tool to get fancy. Click (or press) + to add nodes to the segments. Change segments to curves. Make flowers, snowflakes, and stars.
- Symbols (the cat)
- Insert symbols into your image by clicking the toolbar button with the star on it. Symbols are groups of lines and shapes. You can break them apart (ctrl-K) change the outline and fill, and edit them just like other objects.
- Outline and fill color
- Just click the colors on the color palette to fill a selected object. Right-click the color to change the outline color. If you click colors without first selecting an image, you will change the "default" color, and the next object you create will have your new colors.
- Sizing and rotating images
- Press the spacebar to switch to your Pick tool. Click the object you want to re-size. Handles (little squares) appear around the object. Click and drag these handles to resize/reshape the object.
Dragging corner handles will resize. Dragging side, top/bottom, handles will reshape.
If you click your selected object a second time, rounded handles appear. You can then rotate the object with corner handles, and skew the object with the side, top/bottom handles.
- Eraser
- It's more useful for reshaping objects than for cleaning up mistakes. The eraser takes chunks out of your objects. If you use it on a rectangle or a circle, it will change them to Curves at once. Nodes are created where you change direction while erasing. To see them and move them around, use the Shape tool.
-
- Artistic text
- Artistic text is created by just clicking with the text tool. Edit it as you please.
Fit it to paths (create the path with the freehand tool or with a shape tool, select both text and path, click Text, Fit to Path)
Break it apart -- Select text, Ctrl-K
Change it to curves -- Select, Ctrl-Q
Artistic text letters are just objects. The difference is, you can edit them like text if you haven't changed them into curves.-
- Ordering images
- Each object you create is "layered" above other objects. To change the order in which they are stacked, select an object, press Pg-Up or Pg-Dn to send it to the top or the bottom of the stack. Ctrl-PgUp or Ctrl-PgDn sends the selected object upward or downward, one step at a time.
These should be all the skills you need to create a stunning cover for your class handouts. I'll be looking forward to seeing your projects in the next class.
Projects
Pacman on the Sea This is a simple, yet satisfying little project. Draw a whimsical PacMan complete with stars and a bottle of soda pop.
Puddles Ready for more? The Puddle Project shows a nasty spill on the carpet - two of them actually! One is created with PhotoShop and the other with CorelDRAW.

This is the bookmark project from class 3, Intro to CorelDraw.
Dolly and Shadow
Dolly and Shadow This project uses a range of skills -- drawing with the Bezier tool, weld, trim, knife, envelope, transparency - and how to combine them to make a shadow.
Tracing a bitmapped picture
Chinese Horse In this project you will use the freehand tool to copy, and then use the bezier tool to actually trace a lovely chinese horse.
Note: these last two projects may take a day or so to be loaded.
Check it out.
I've been looking for some first-rate online Corel tutorials. I think you'll like these.
Online Corel Tutorial. T. Michael Clark's tutorials are as smooth as the site's appearance suggests. Michael was also the tech editor for Teach Yourself CorelDRAW in 24 Hours, so you already know the quality of his work. (Take another look at the lizard in the poster above if your memory needs refreshing.)
About.com's Graphics Software. Sue Chastain will provide you with guidance from opening the program to creating sophisticated projects. It's definitely top notch.
Back to HomePage
Photoshop Page
Word Processing Page
Resources


